Woocommerce 3D Products
- created: 08/13/2018
- latest update: 09/06/2019
- by: Rcreators Websolutions
- rcreators.com
- email: rishi@rcreators.com
Woocommerce 3D Products add functionality to add 3d Model file to your product, configure them and showcase them on front side in 3D with custom material and color options.
To achive it we have used CMB2 library for backend custom option for product configuration and three.js library to showcase product in 3D on front side.
Special Thanks to developers who build such library like CMB2 and Three.js. Also Special Thanks to Woocommerce Team for full featured e-commerce platform for wordpress.
Installation
Installing Through Dashboard:
- Go to Plugins -> Add New -> Upload
- Choose the installable ZIP file (that you have download in your computer from codecanyon) Upload that file.
- Now, click on activate link to activate the plugin.
- Extract the installable ZIP file (that you have download in your computer from codecanyon) Upload the extracted folder into wp-content/plugins directory.
- Activate the plugin through the 'Plugins' menu in WordPress.
3D Introduction
To Use this plugin, you need to have basic knowledge of any 3D software like blender, 3ds max, maya, cinema 4d . As we are working with 3D model and their material, you need to know how to export 3D object in desire file format and know material name of each part for which you want to give customisation option to user.
Before using Woocommerce 3D Products, follow these simple steps:
- Create / Download the 3D model file and open it in 3D software.
- Note down the material name of each part you want to customise. For example, if you have 3D model of chair which have top sitting fabric and bottom wooden. That means the model have 2 separate material created for it. Note Down that material names first.
- Now, Export the 3D file in desire format. Most of the 3D software give option to export 3D file in FBX and Collada file format. For export in Json, you need to read three.js documentation on installing plugin for it and use it properly. While exporting in any format, make sure you disable exporting of animation, lights and other features which you dont want from file.
- If you have no knowledge on any 3D software but you still have 3D file somehow, you can use this three.js online editor to load it and then know desire details as described above and export it in json too.
For more help about knowing 3D Workflow, i suggest you to install Blender which is free 3D software and follow its step by step tutorial here Or you can hire our 3D designer to create 3D model of your products and adding and configure them on your website. To hire our 3D designer, you can email us at [email protected]
Getting started with Woocommerce 3D Products
-
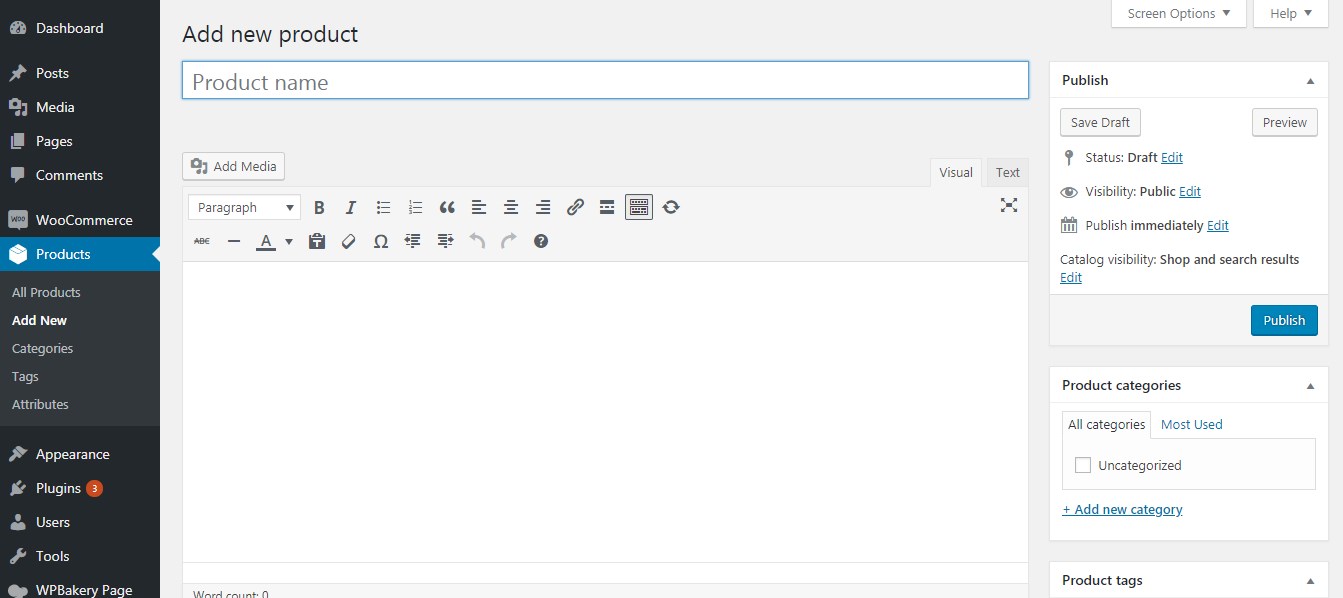
If you click "Add Product" in woocommerce, it will take you to new page which have all product fields.
-
After Filling all top details and product details, scroll down to bottom of the page. Here you will get Woocommerce 3D product Data fields.
-
Each Fields have appropriate title and also have description as well. You can use this fields to add 3D model of your product and configure everything. Still lets go field by field in details.
Fields in Detail
By Default, Matrix effect is pre-configured. So without changing any perameter, you will be able to generate below effect.
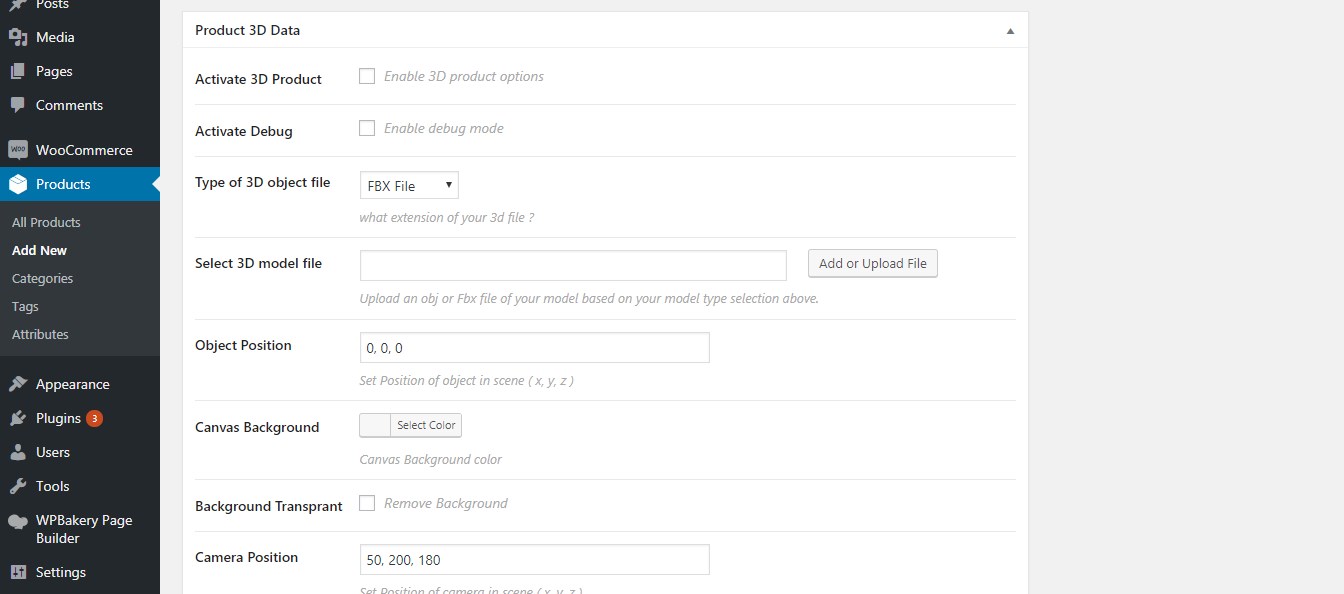
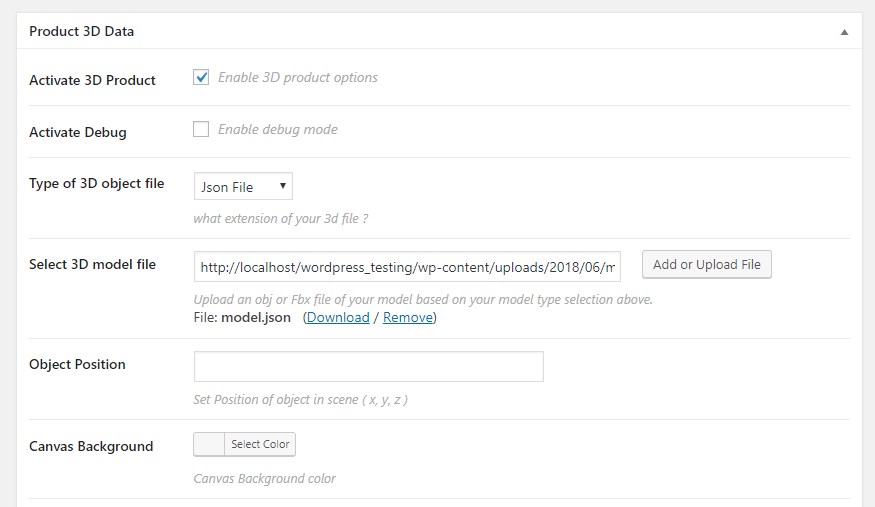
1) Activate 3D Product
Do you want to activate 3D product functionality for this product or not. You need to tick it, if you want to use plugin functionality else leave it as it is and plugin wont apply for this particular product.
2) Activate Debug
We have added state functionality of three.library in debug option. So if you want to know howmuch ms its taking, howmuch memory it's taking on front side, you should enable this option. Make sure you disable for final version of your product as its not good to show debug options to user. After enabling it, you will get something like below on your website front side on respective product page.
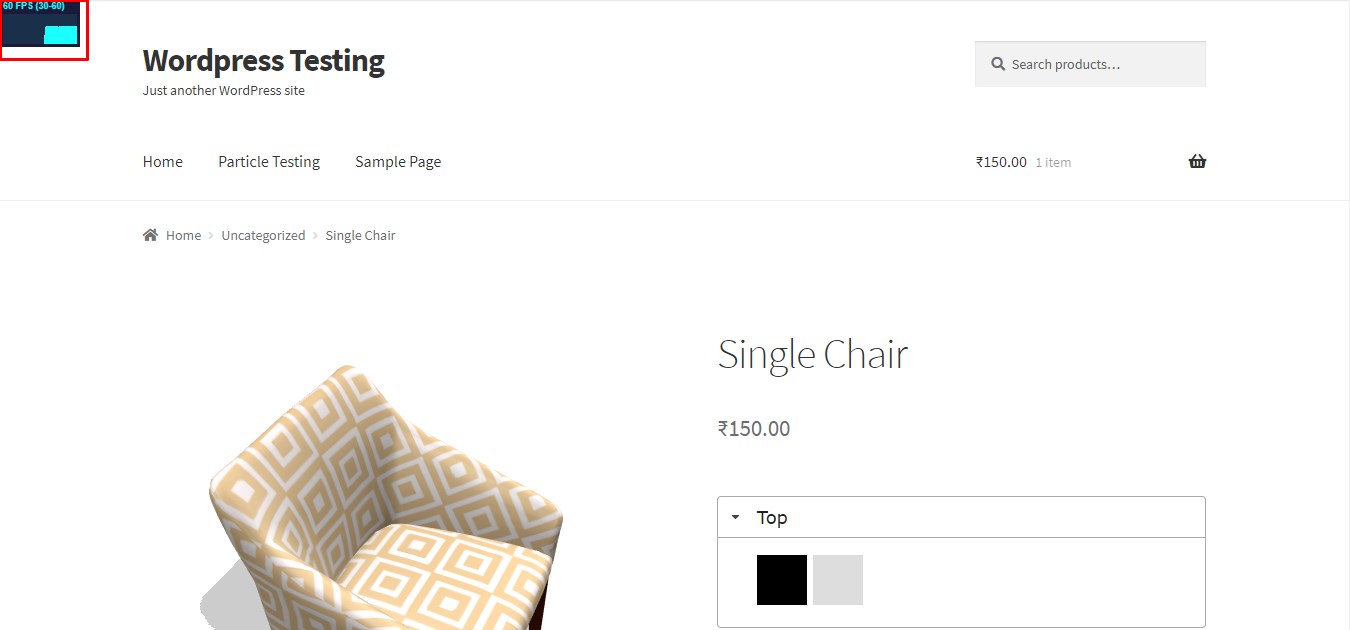
Clicking on the little box on top left corner, will change statastic from ms to ram and so on.
3) Type of 3D object file
As you know plugin is only supprting 3 major 3D file format. You need to select the one in which you have exported or created your 3D model like FBX, Collada or Json.
4) Select 3D model File
After selecting which file format your model is in above step, select your model file here. Clicking on add or upload file button, it will open native wordpress uploader by which you can upload your 3D model file and select it.
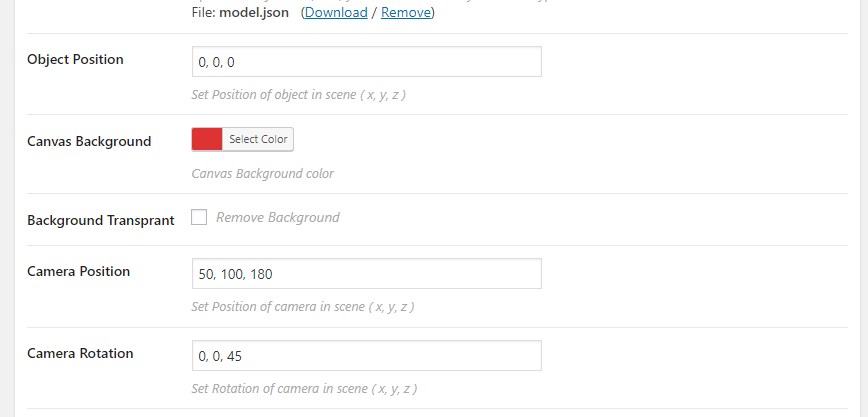
5) Object Position
Its the location in 3D space where you want to add your object. Default its 0, 0, 0 means on all axis its 0 cordinate. If you want it to be center its enough but for few model you may want to move it further back or front on y axis to look it in center. Also The camera's view is attached to object. So when you change the cordinate of the object, Camera view will also change accordingly.
6) Canvas Background
Background color of your canvas. So you can set background color based on product collection each. As example, for black product, you can have white or gray background color and for white product, you can have black or dark gray or any other color for background. Default it will be light gray or white color.
7) Background Transprant
If you dont want any background color for canvas and use your Page background as background directly, tick this option. So canvas will become transparant and page background will be used as background for 3D model.
7) Camera Position
Based on scale of your model and distance you want it away from camera, you need to setup camera position in canvas. So with this parameter, you can do that. You can insert camera location in 3D cordinate 0, 0, 0 which is x, y, z cordinates respectively. Now, here is understanding on how it works, based on the cordination given, camera load on the specific location and create a radial path for its movement. So when you move camera with orbit control to view around, it rotates accordingly to the path created by parameter given in this field.
8) Camera Rotation
Its same like camera position but it give initial rotaion to camera. So you can decide on which angle camera show when it first load. It will also change based on user move camera. This is only useful for first view when load.
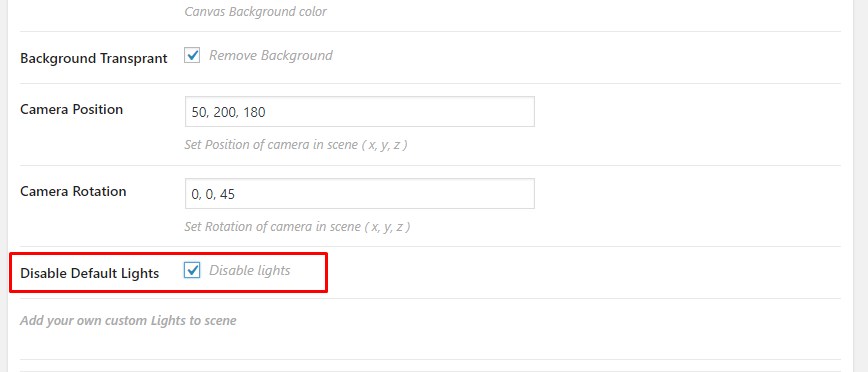
9) Disable Default Light
As you already know that plugin is having 3 point studio light setup to make scene more realistic. But in few cases, you might need to have your own light setup. In such a case, you can disable our lighting setup and add your custom light to scene. You will learn on it in next section.
Custom Lights
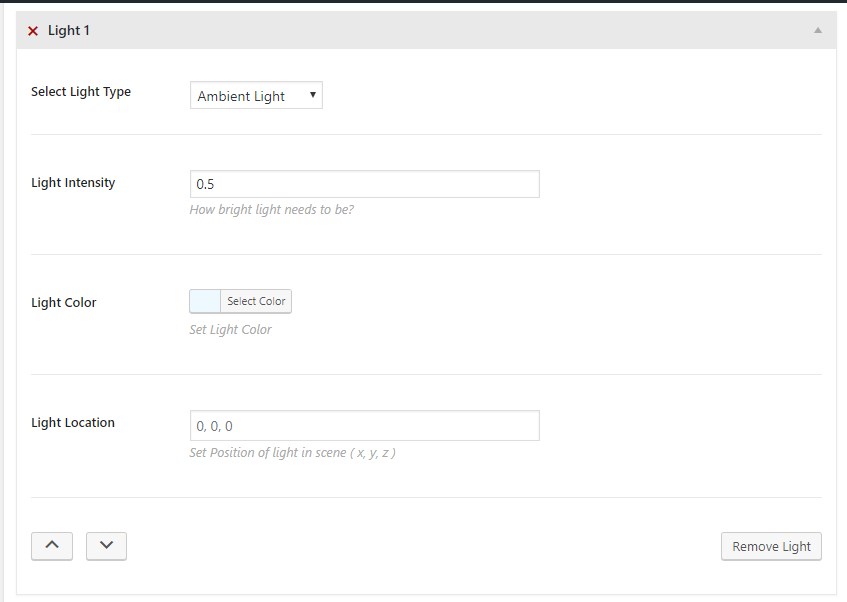
Default you have something like below which indicates, there is Light 1 in the scene but as there is no parameter selected in it, it wont work.
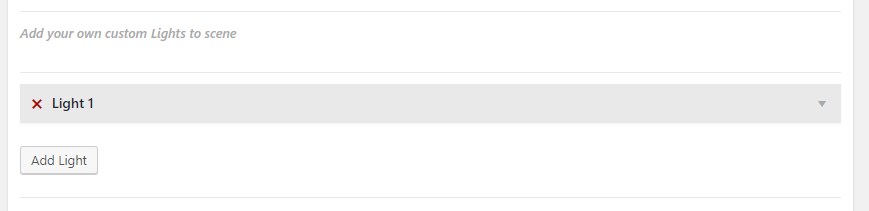
Clicking on Add light button will add another light. You can add as many of light you want. There is no limitation of it.
The X besides Name of light "Light 1" is a delete button for light. Clicking on it will remove light from the scene.
Now lets get into fields required for each light. Clicking on light 1 panel, it will open the parameters it needed.
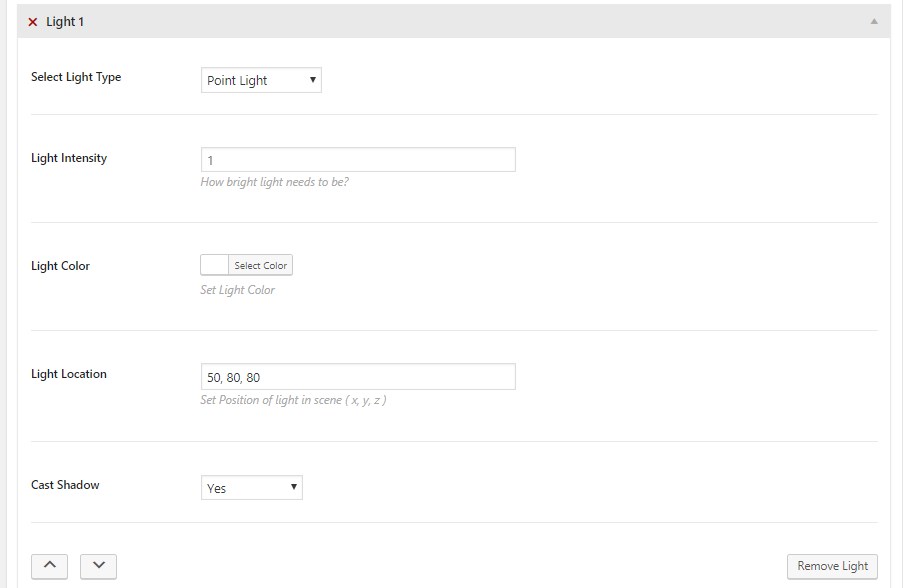
1) Select Light Type
In this dropdown field, you can select which type of light you want to add to scene i.e. Point Light, Directional Light and Ambient Light
To know which one to use, you must have basic knowledge of lights in real life. Here is basic introduction for each.
- Point Light: You can visualize it as a bulb which light up in 360 degree and it will remains in center of it.
- Directional Light: You can visualize it as car light. So it starts from one place and went on specific direction it facing.
- Ambient Light: You can visualize it as environment light. So it will effect every part of object and it adds additional effect of light on object apart from above 2 light.
To use custom light, you always need one Ambient light at least at 0.5 intensity and top of it you can use 2 point light or one point light and another directional light. You can play with the parameters and also find desire visulisation in it.
Other Parameter of light is quite easy to understand like intensity, color, position and Shadow. So you can play around it and get desire result
You can sort the lights by clicking on up / down arrow on left corner of the box but it wont effect visually in scene as whichever light generates first or last, result will always remains same.
SVG Material
Svg Material is used for unwrapped texure in 3d file. If you have any 3D model which dont have separate materials to identify and created using unwrapped texure, you can use SVG for same. Below are steps on what to do for same. Also SVG file only support color changing and not texure image.

There are few things you need to know before proceeding further.
- Add ID attribute to each path you want to change color in any programming software.
- Remember those ID of each path from SVG file which you want to change color.
Now if you have above thing ready, you can move to next section.
Configuration Panel
Initially we had material group setting to change color and texure for model with normal material and svg material as well.
Now we have converted material group into Configuration Panel with more options like Material, Text, Image and Gradient.
There are few things you need to know before proceeding further.
- Material Name or Path ID of the part for which you want to configure the options.
- Texures and colors which you want to propose
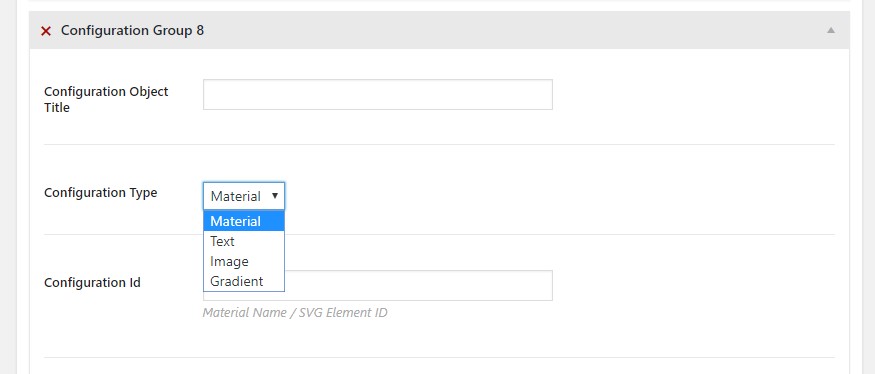
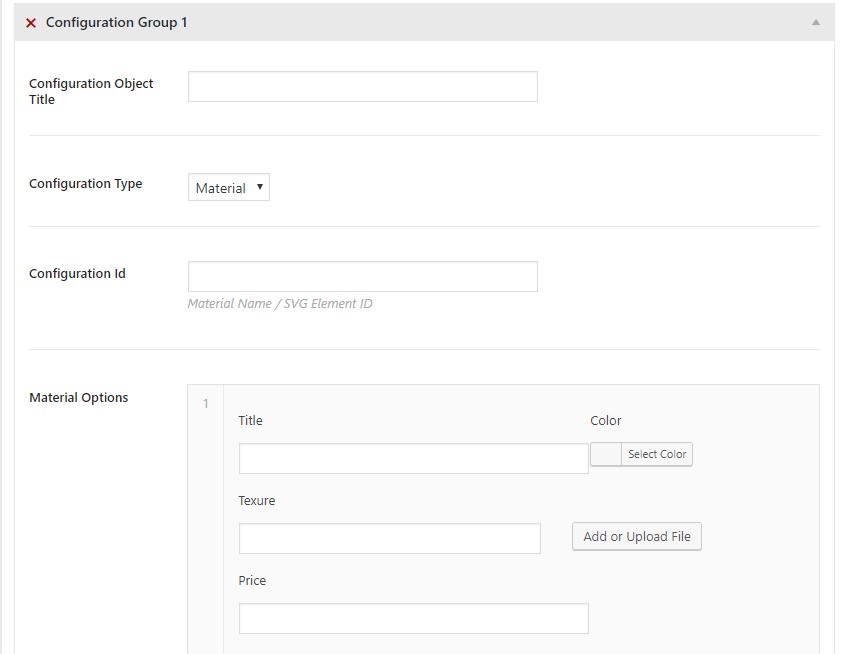
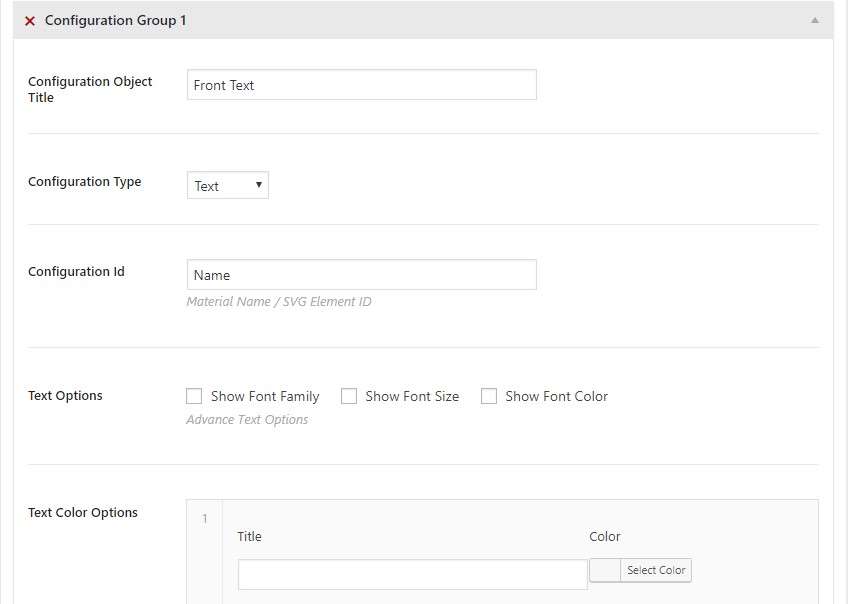
After Having above details, you can start adding things on backend. Here is basic screenshot of configuration panel.
As you see, there are mainly 3 options in it.
1) Configuration Object Title
This parameter is basically a part name which user will see as a heading. So they know which part of the object will affect if i change option in it.
2) Configuration Type
There are 4 type of configuration you can make. Each option will be discussed in details below yet here is small introduction for same.
- Material: Material is replacement for previous material / color changing functionailty for normal material and svg material.
- Text: Text is new option which will work with SVG material only. By which you can change text added to 3D model via SVG.
- Image: Image is new option which will work with SVG material only. By which you can change embedded image added to 3D model via SVG. You can also enable option where visitor can upload their image and use it too.
- Gradient: Gradient is new option which will work with SVG material only. By which you can change gradient added to 3D model via SVG.
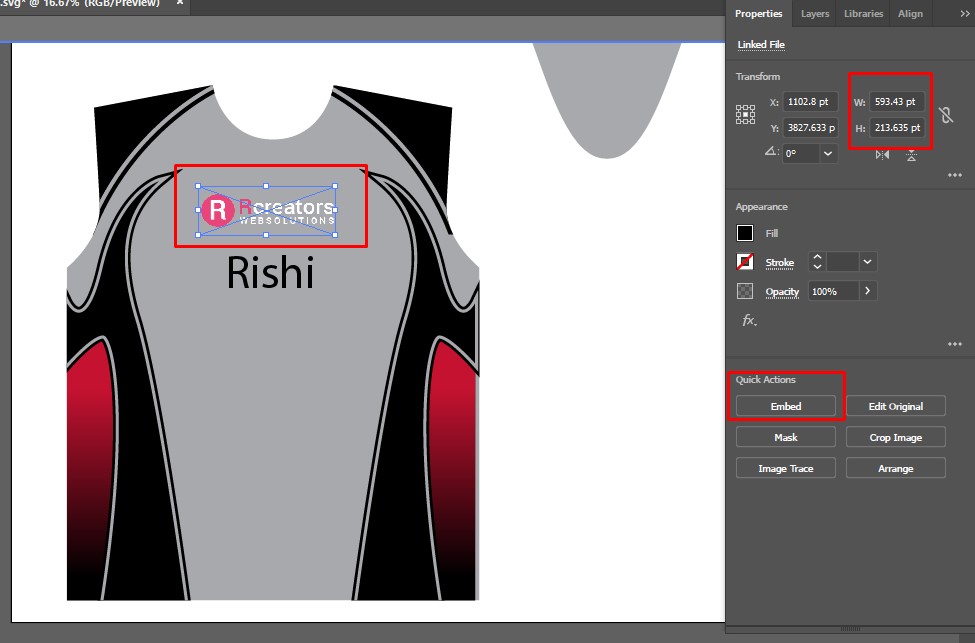
3) Configuration ID
For SVG:
Put that Path ID for which you want to change color / text / Gradient / Image.
No SVG:
If you are a 3D artist or know 3D software, please don't mix up the material id in 3D software with this parameter. This field is for material name.
3D model can be build as a single polygon object or group of multiple objects. So to make all the part visible properly, we assign materials to the objects. Now for a understanding, we are not using material id assign to object. We are using material name which assign to that particular material id.
I understand its little bit confusing but you will get idea in the example provided in final section.
Just get the material applied to this specific object and add its material name into this field.
Note: You can also use multiple path id / Material Name in single field with comma space ", "
Configuration Type: Material
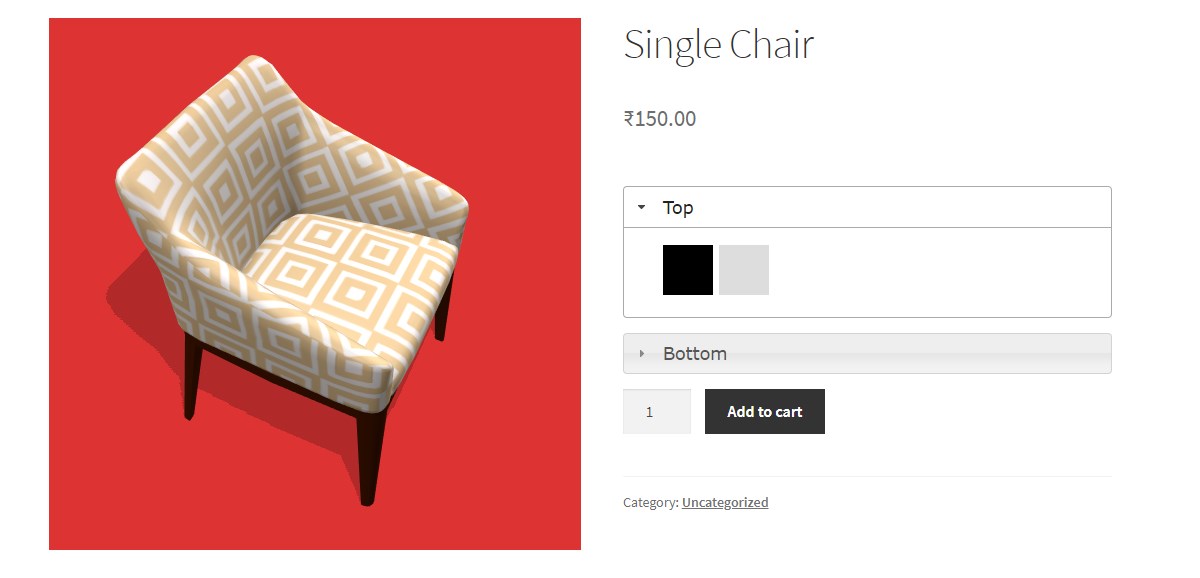
Material is a configuration type by which user can change color and texure of 3D model and select option they liked. It will also carry forward to cart and order too. So when user customise it, admin also know which customise they asked. This is the only option wihich will work with model svg and non-svg material.
Here you can add color and texture option for the material and object you selected. It contain 4 simple fields.
a) Title
Title is just a identification for user and admin, which option it is. So when user select this option, in cart and order, this text will be the value to identify.
b) Color
Select the color you want to give as a option. For example, if your chiar bottom part is avaialble in multipe color, select one color from it.
c) Texure
Texure is same as color, if your object can have texture option, you can select the texure here. For example, if your chair top base sitting part is avialble in multiple texure, select one texure from it.
d) Price
Add additionaly price for the respective texure or color option for same. So on front side when user select this option, the price will add up to main price of product.
Now after configure above, you will only going to have one option for one object part. To have multiple option for this particular part, you need to add more material options to material group.

Configuration Type: Text
Configuration Type - Text can be only use with SVG material. For that, first you need to prepare SVG file to have text. Follow below instruction to do so.
In software like illustrator, you can set up text onto a path.
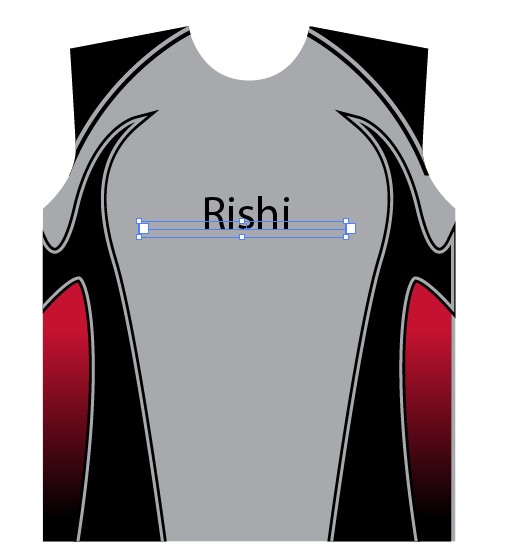
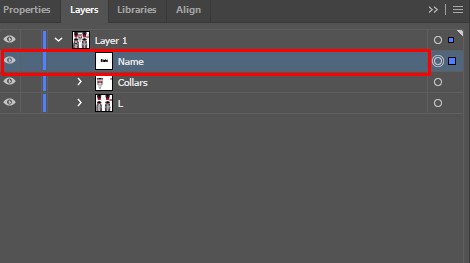
Now go to layers tab and rename the text layer to "Name" or something you can remember.
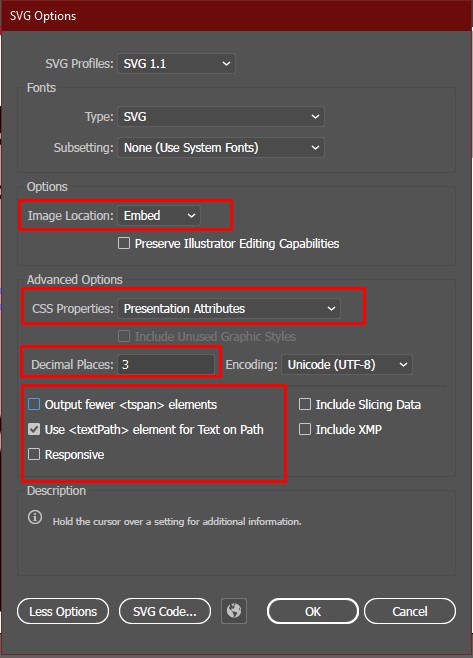
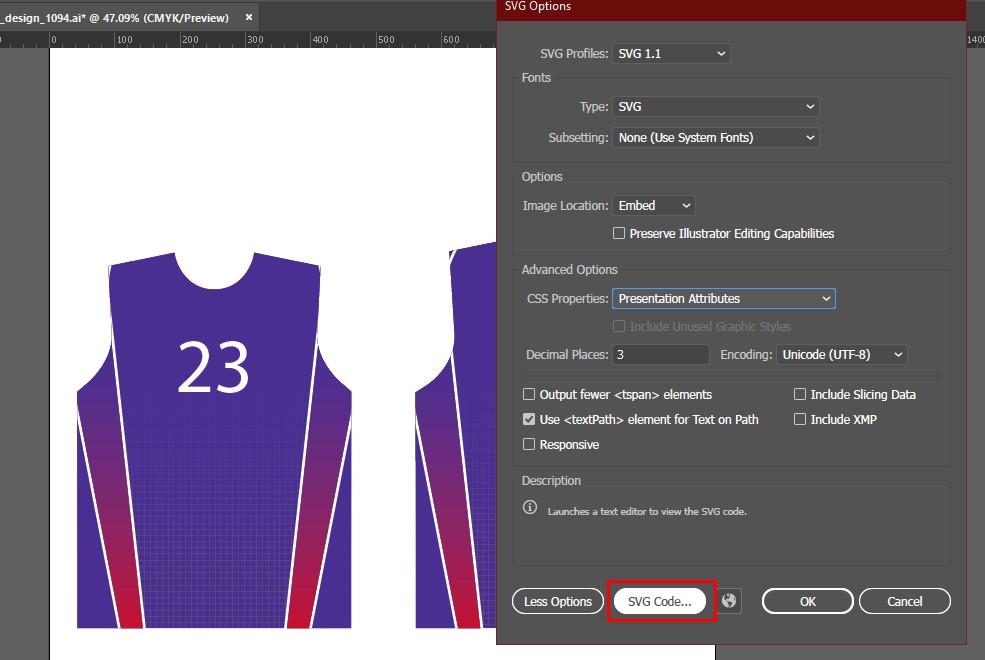
Always make sure to save a copy when exporting out as an SVG.
Make sure your export save window has the following configuration. The Text won’t work without "Use < textPath > Element for Text on Path" ticked.
Now login to wordpress admin and go to product edit screen and in configuration panel, select configuration type Text. Also make sure, you are using updated SVG file.
Find TextPath Id from SVG file and add it to Configuration Id. Most of the time its Name of layer which you set in illustrator but sometime it changes. So just make sure. In Our case its "Name"
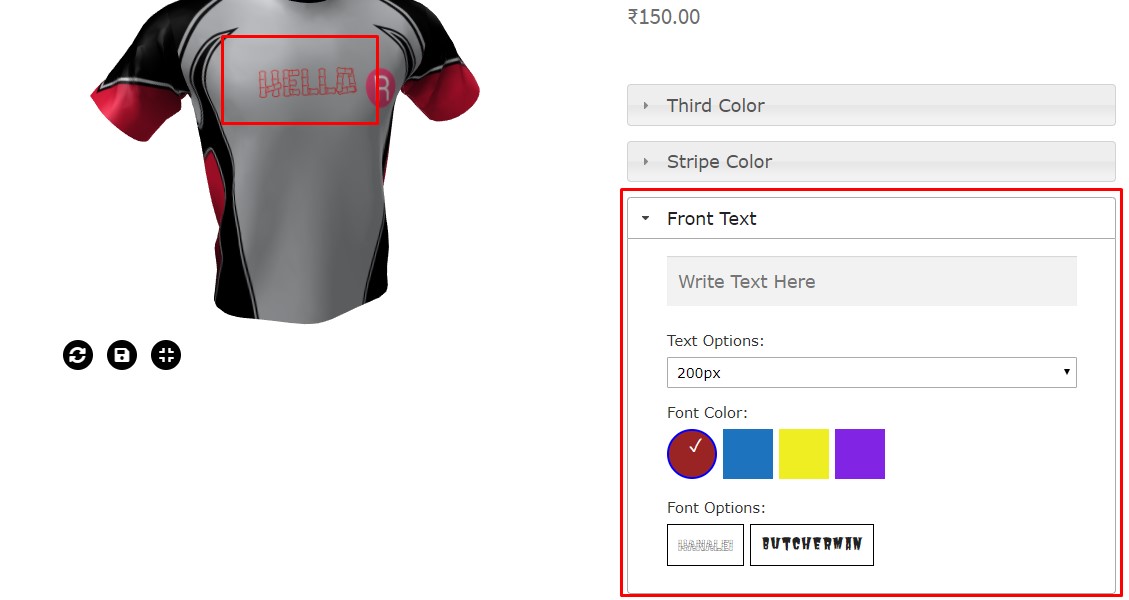
You can see, after selecting text, you get additional option to enable like font family, font color and font size. If you want your visitior can change this setting, you can enable it and it will reflact on front side as well.
If check your product on front side it wont show font family and color options. To do so first you need to add color option below.
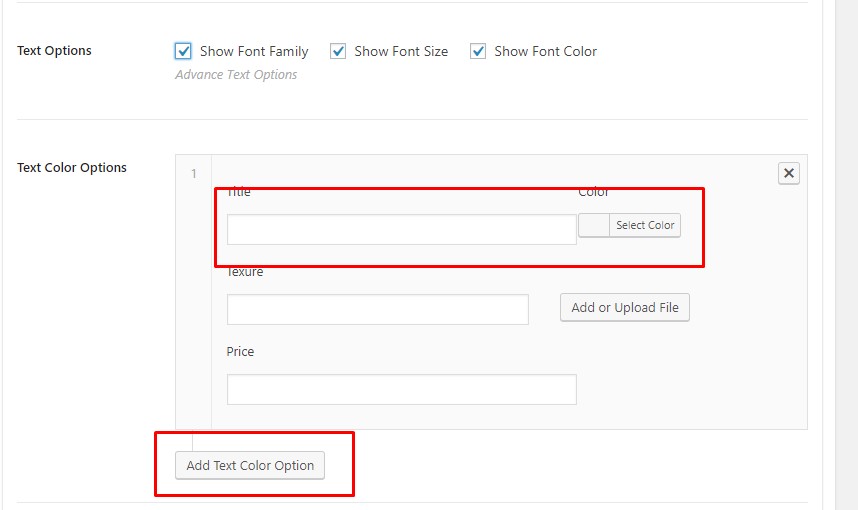
You only need to use Title and color for it. Other options are not available for text.
For Font Family, you need to first Download fonts you like and convert them into base64encode and create font css using it. You can do it with help of online convertor like Font-Convertor or Transfonter. Both will generate base64 embedded font css which you can use in next step.
Go to wordpress admin -> Setting -> WC 3D Options. Here you will see option to add fonts family.
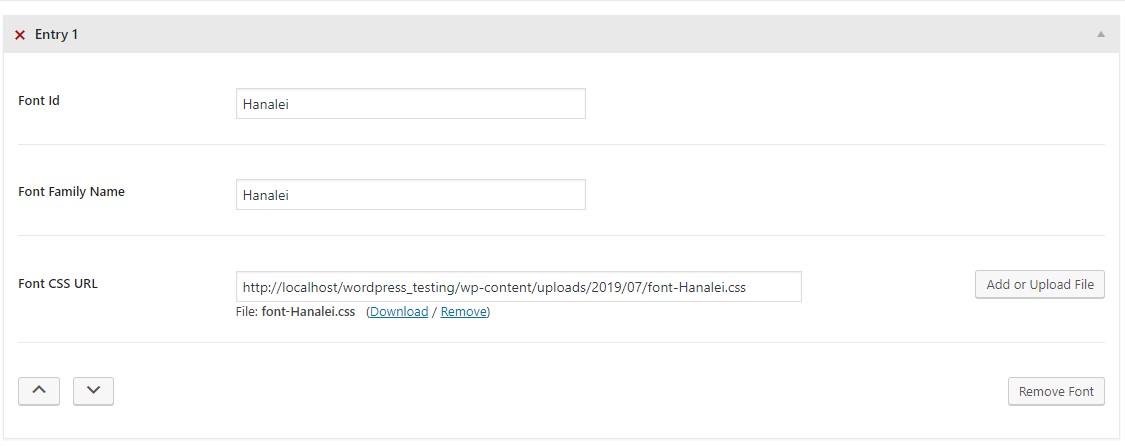
You can use font id which will be unique for each font, font family for css and font css file which you downloaded from above step. This will add fonts to the front end. You will be able to change it on 3D model as well.
Configuration Type: Image
Configuration Type - Image can be only use with SVG material. For that, first you need to prepare SVG file to Image embedded in. Follow below instruction to do so.
In software like illustrator, you can add image to your svg desire location, Embed Image and set its width and height as well.
Now go to layers tab and rename the text layer to "Logo" or something you can remember.

Always make sure to save a copy when exporting out as an SVG.
Make sure your export save window has the following configuration. Make sure you selected Image location Embed.
Now login to wordpress admin and go to product edit screen and in configuration panel, select configuration type Image. Also make sure, you are using updated SVG file.
Find Image Id from SVG file and add it to Configuration Id. Most of the time its Name of layer which you set in illustrator but sometime it changes. So just make sure. In Our case its "Logo"
Like Text, For image, you will also get custom option to select.
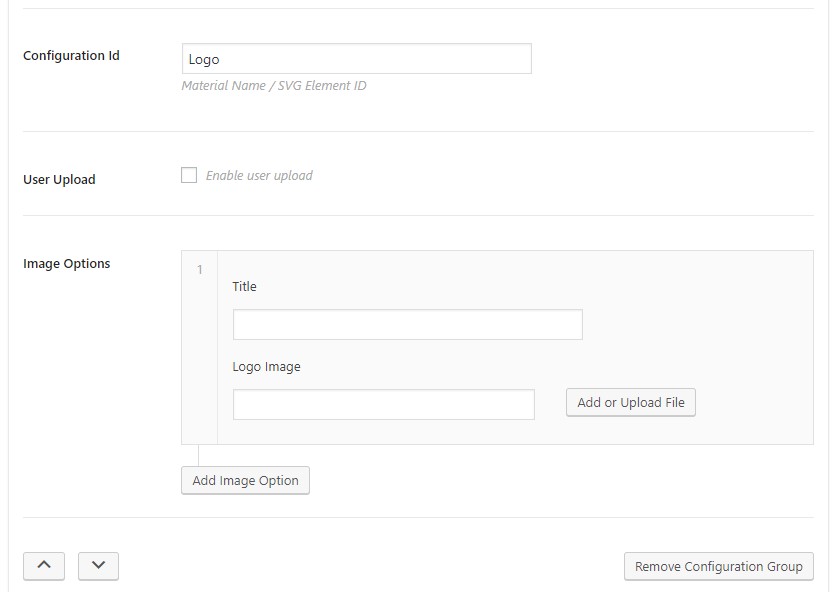
By enabling User Upload, your user can eble to upload thier image and use it as logo. If you also want to provide more logo options from your side, you can add it below in image options. Set Title and Select Image.
After setting up, you will be able to see this on front side properly working.
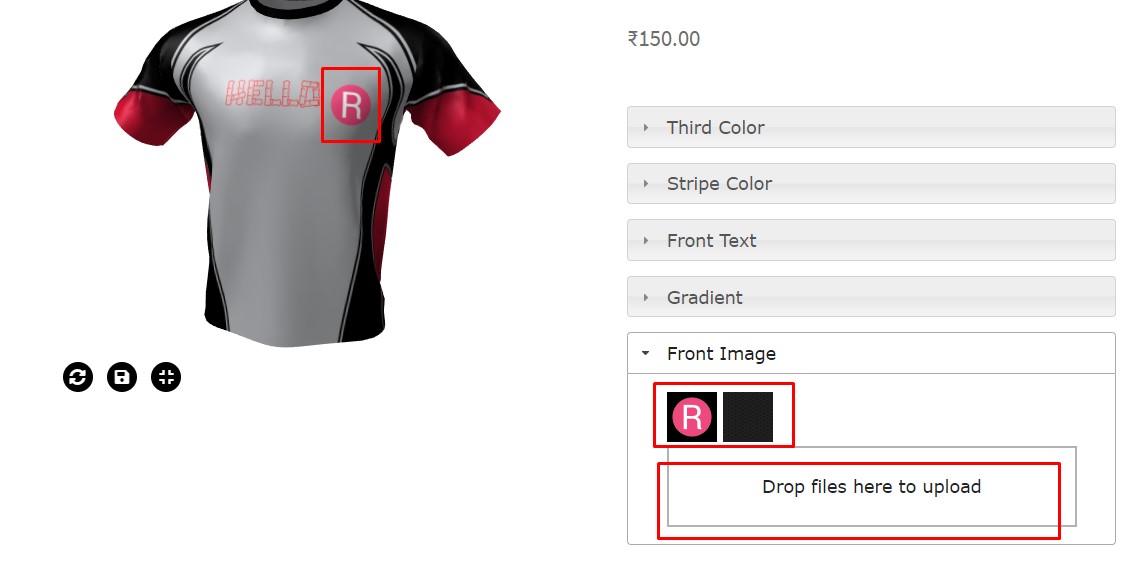
The Image uploader will only work with Jepg and Png file formate for security reason.
Configuration Type: Gradient
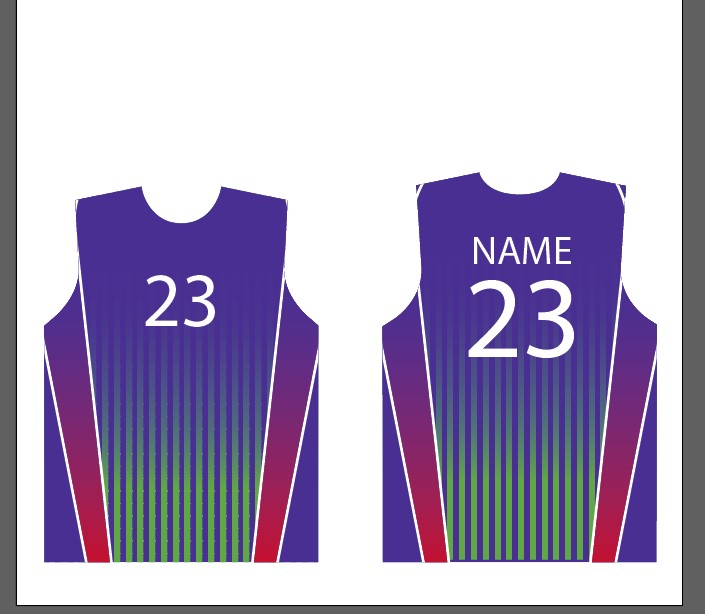
Configuration Type - Gradient can be only use with SVG material. For that, first you need to prepare SVG file to have gradient added to any shape. Something like Below.
Get the Path Id of the Gradient shape from SVG and use it as configuration id in product setting. You can rename layer like above and use same as well. Save a copy as same setting and use updated svg into product.
Now login to wordpress admin and go to product edit screen and in configuration panel, select configuration type Gradient.
You will get new options in which you can add title and 2 color option for gradient.
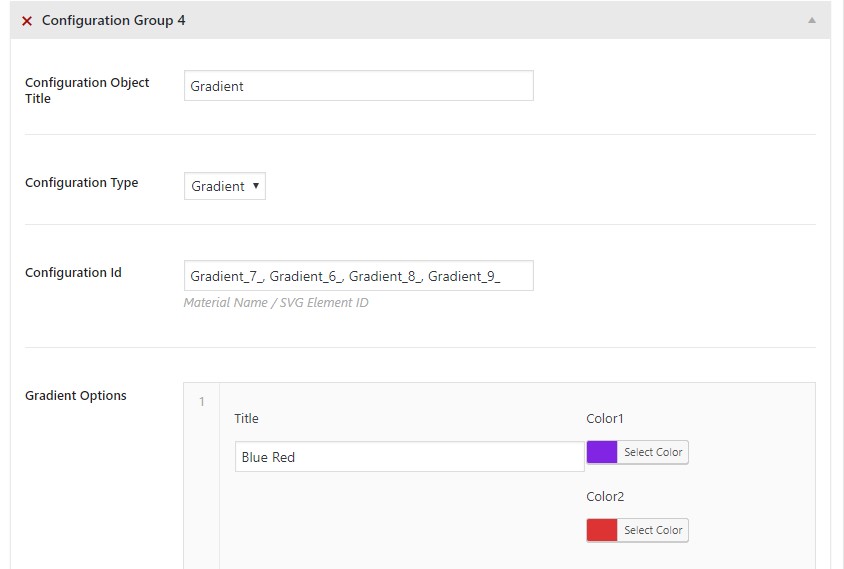
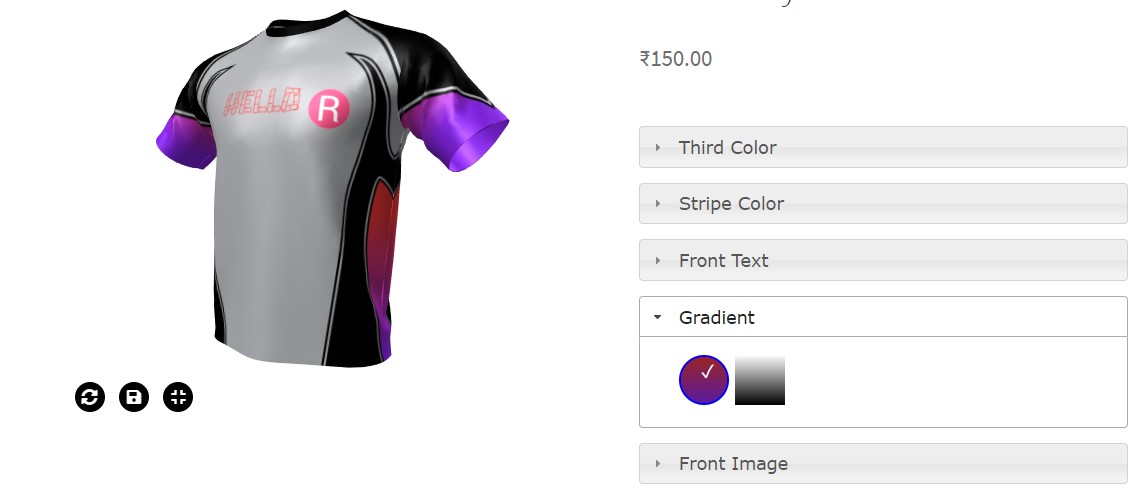
After adding options, you will see them on front side and you can change gradient on 3D model.
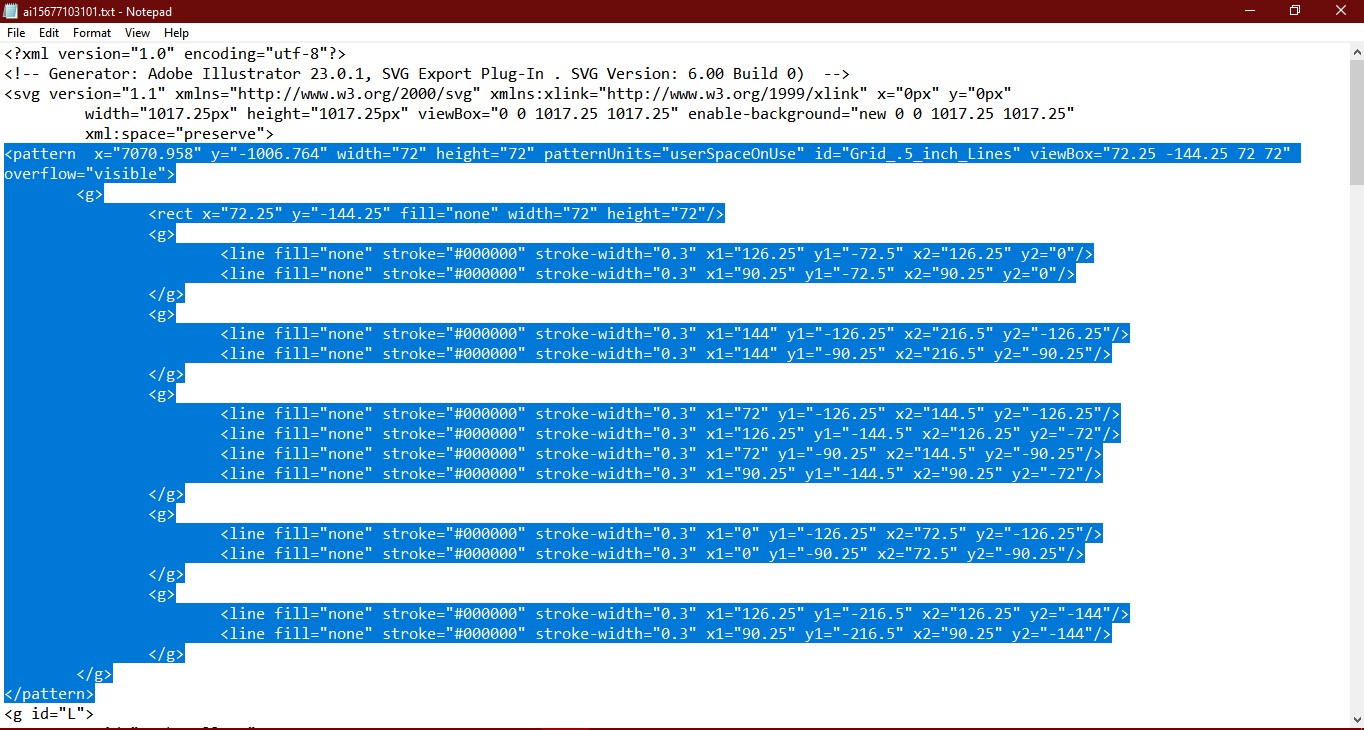
Configuration Type: Pattern
Configuration Type - Pattern can be only use with SVG material. For that, first you need to prepare SVG file to have pattern added to any shape. Something like Below.
Get the Path Id of the Gradient shape from SVG and use it as configuration id in product setting. You can rename layer like above and use same as well. Save a copy as same setting.
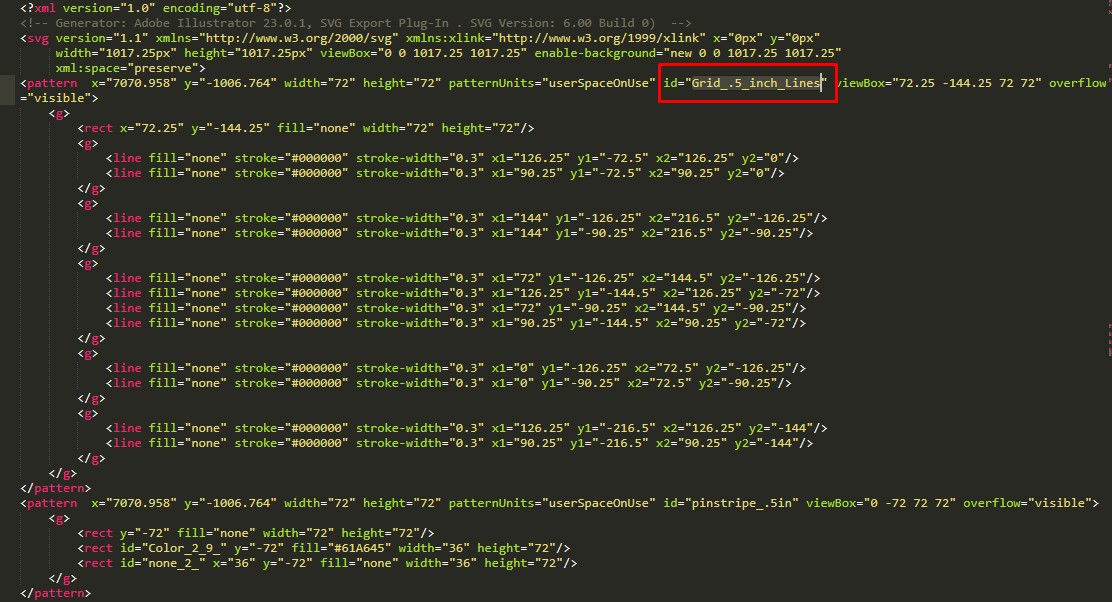
Now Pattern is required few more things to svg then other configuration type. If you want to have changable pattern, you also need that pattern code to be added to SVG also. To do so, first change current pattern in illustrator to another pattern you want to use and go to save as SVG with all same setting But instead of saving Svg, Click on Generate Code button at bottom.
This will open complete svg code of the new design. At top of the file, you will find < pattern > code. You need to copy all code from < pattern > to and paste it in previously saved SVG file of yours.
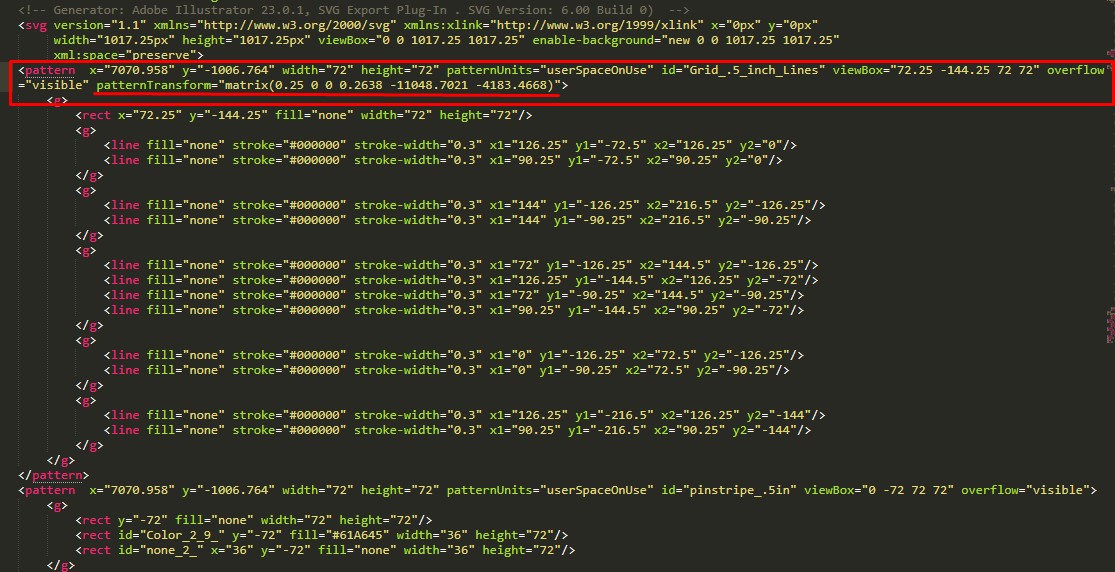
Here, you can see there will be already a another pattern code, which is default pattern. Above that you can put your second pattern code. Also note Id of the pattern as well for configurator. You can change id if you want in newly added pattern.
Then go down and scroll the code and you will find other pattern code but that will contain transform value.
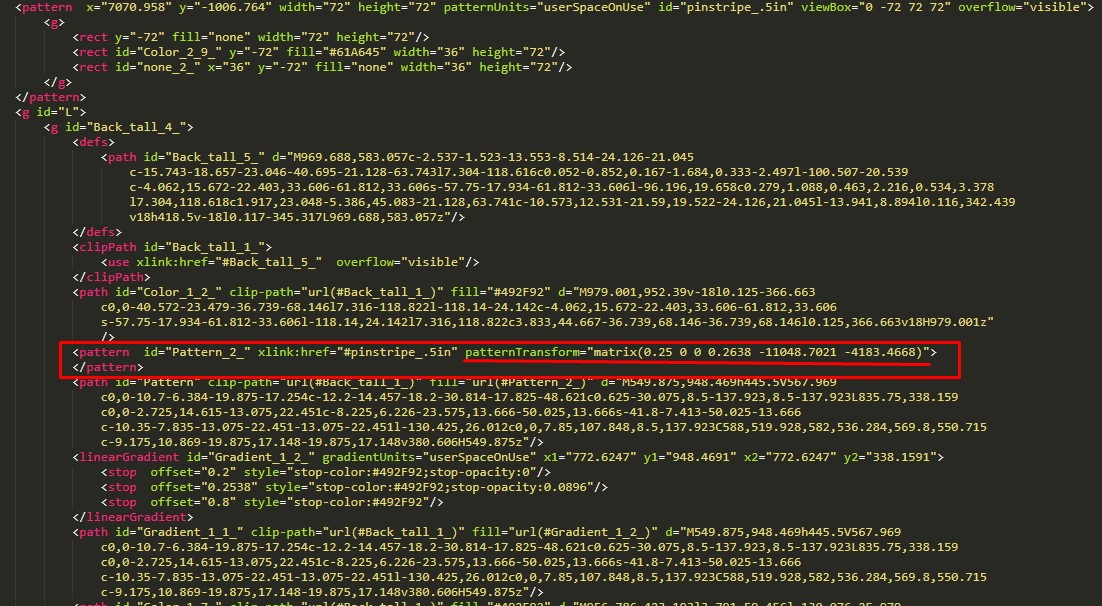
Copy this transform Value and add it newly added pattern as well. This will make sure, your pattern size refrence of current pattern size.
You have to do this steps for all the pattern you want to have as option for selection.
Now login to wordpress admin and go to product edit screen and in configuration panel, select configuration type Pattern and also use updated svg into product.
You will get new options in which you can add title, Pattern Id and Pattern Image to just display user to click on.
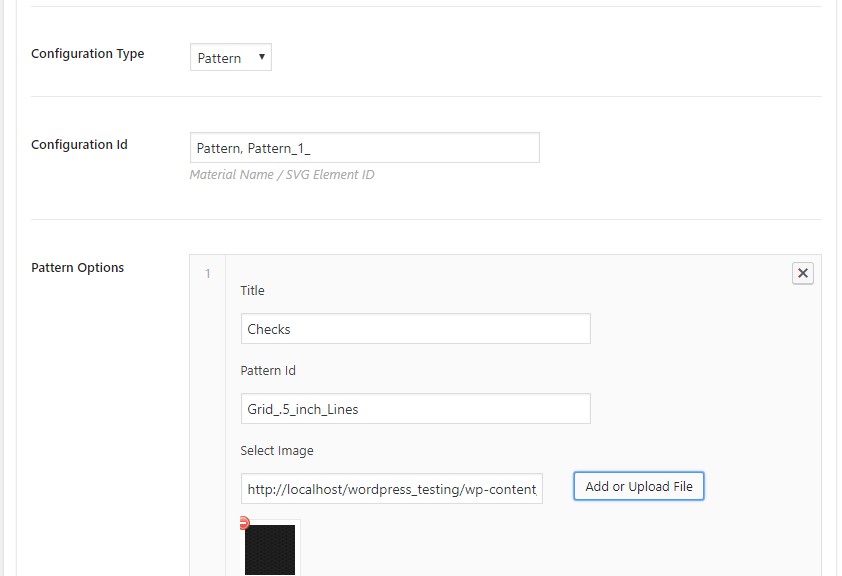
After adding options, you will see them on front side and you can change gradient on 3D model.
Troubelshoot
- If you enable 3D option and it won't show you anything, this means theme is overriding woocommerce theme files. In case of this, you can follow below steps:
- Install child theme for theme. Dont edit main theme.
- Go to 3d plugin folder and copy woocommerce folder from it.
- Paste it into child theme folder.
- After adding material group and material option, if you dont see them on product page, Dont worry. Options are attached to add to cart button action of woocommerce. So mostly its issue with price or stock. Check if your product have price and product is in stock. If you add price and make product in stock, it will show.
- After adding few material group, if you are not able to add new group or if you add new group but its not saving, then its issue with php max_input_vars value in server setting. Please increase it and try again. It will solve the issue.
Example
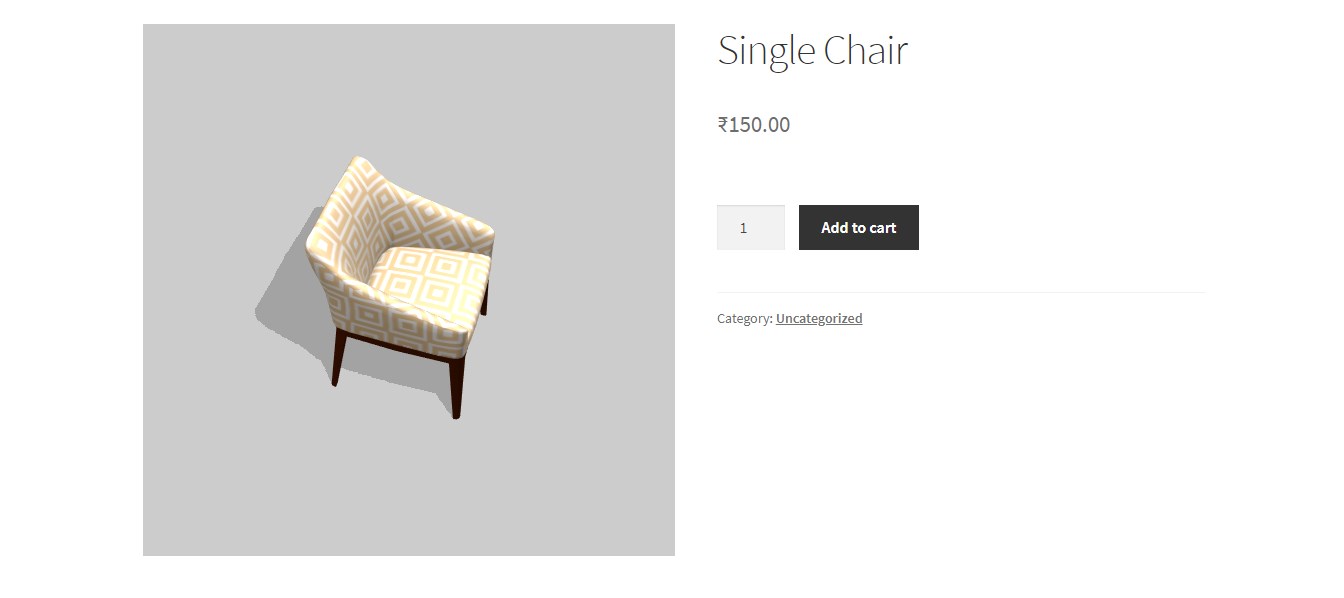
In the example, we are going to use same Chiar Model which you are looking in screenshots. To understand it properly, we have included the chair json file for you. You can download it from here. Save it on your desktop for now. If you dont want to use this one and want to use your own, then please make sure you have that 3D file in either fbx, collada or json format exported and have texure included too.
Now lets start configure it!!
As the downloaded file is json file, you need to select file format json in dropdown and select this file in it. Also tick 3D product data at top and update product.
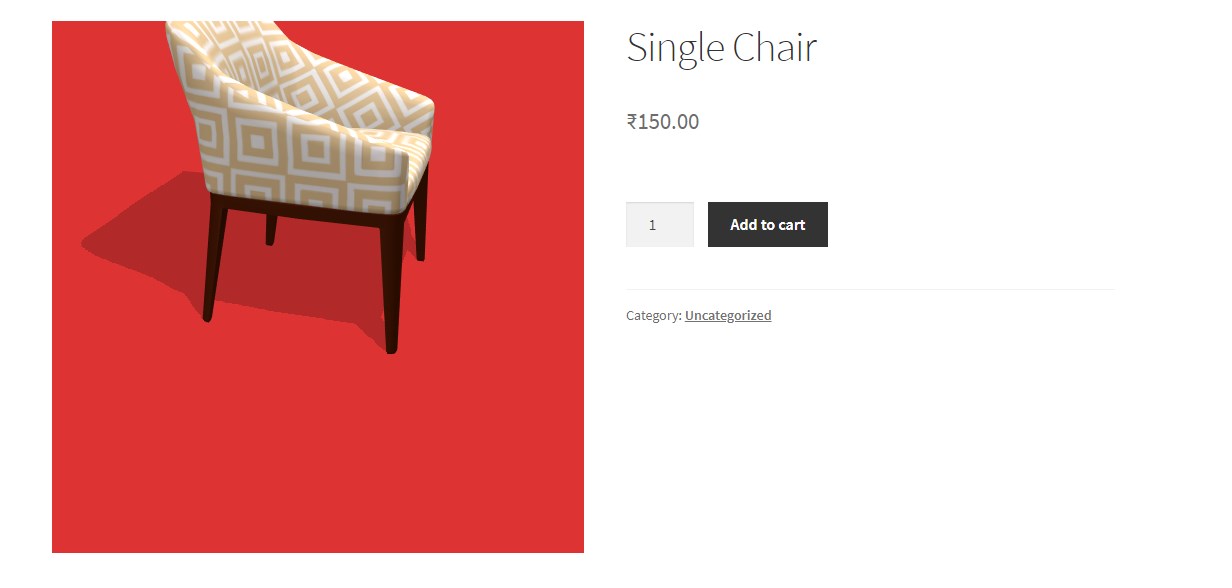
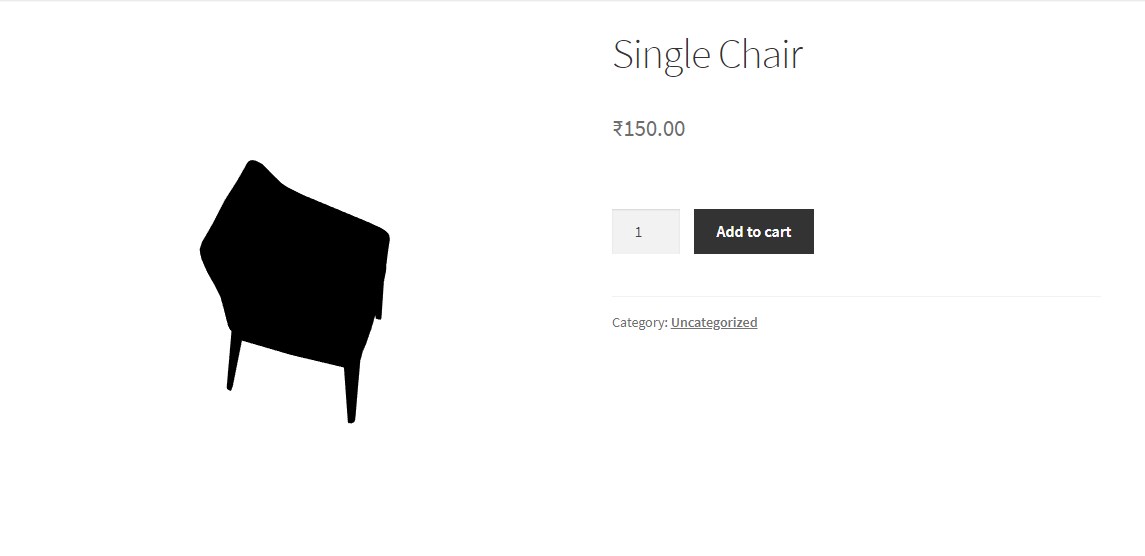
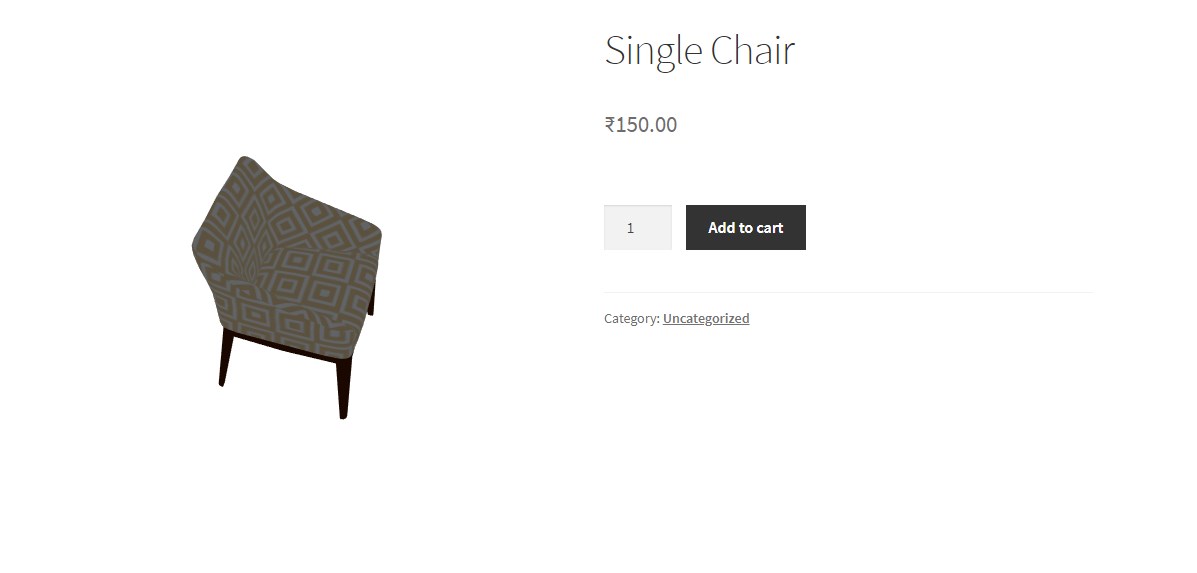
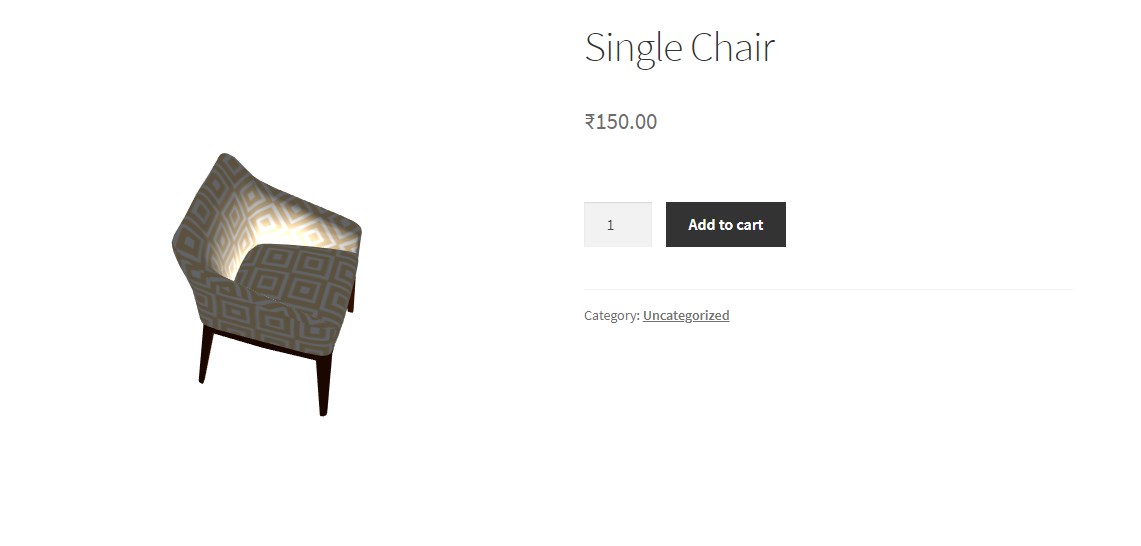
If you look your product on front side, it will look something like below. you will be also able to rotate it right now. But if you notice there is nothing on right side to customise.
If you happy with the result then you dont need to change much things and just skip to the material group part else you can change object position, camera position, canvas bg and transparent canvas option to achive desire result.
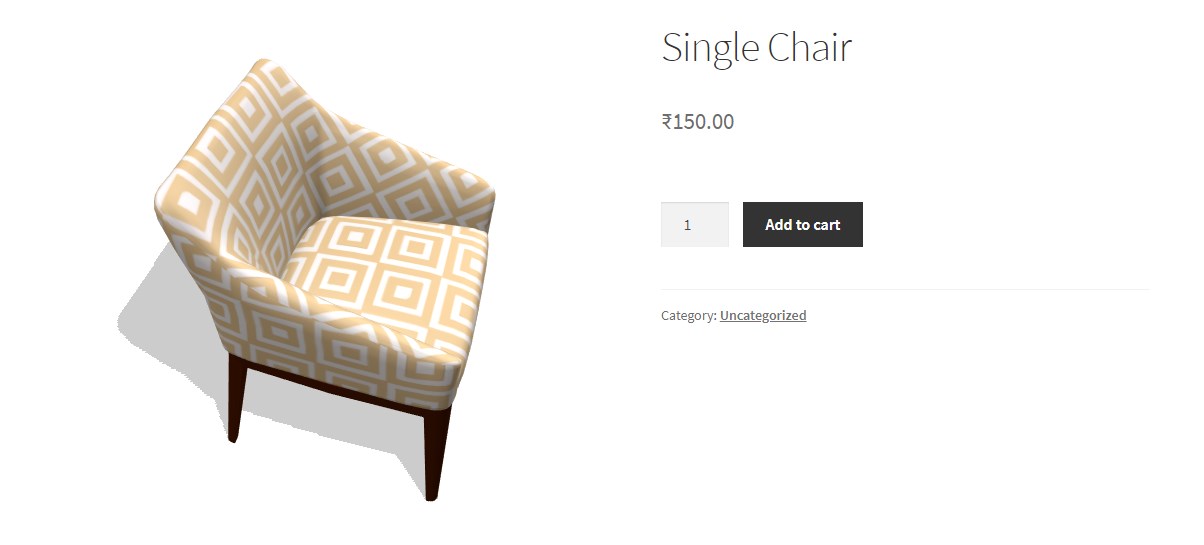
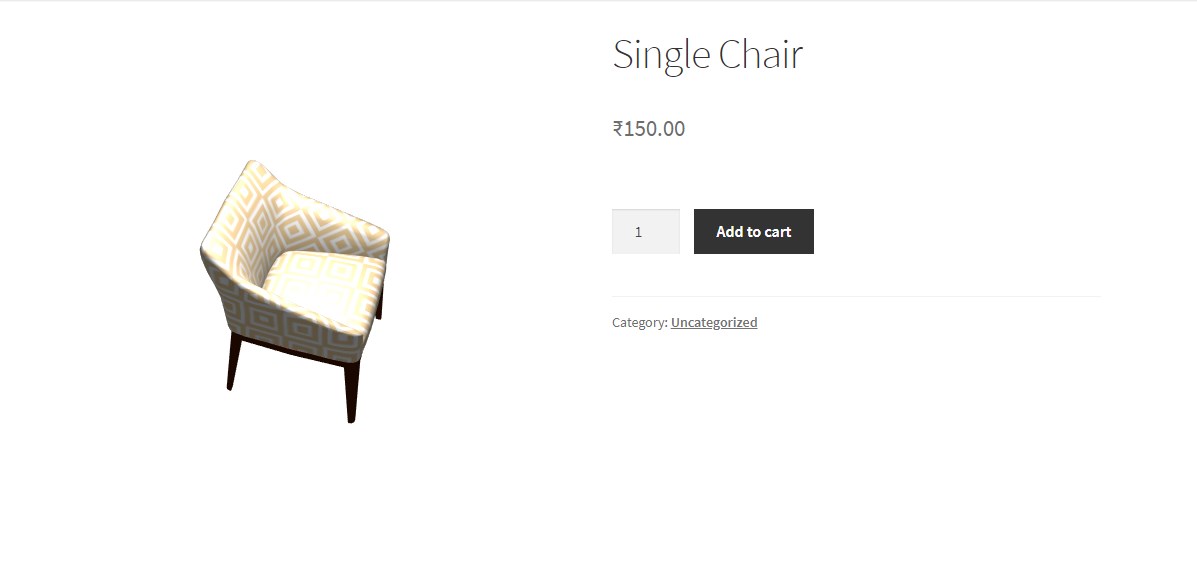
See the difference with the parameter changed.
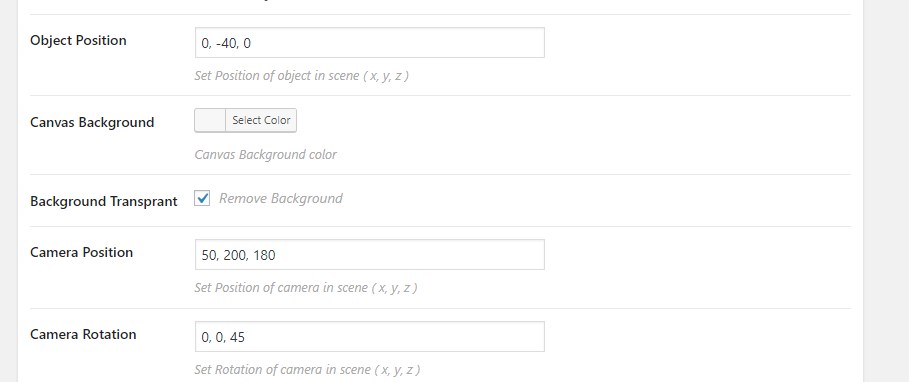
You can play around this parameter untill you get proper result. Now lets move to lighting setup.
You can either add new light to the current lights or you can completly disable default lightings and add your own lightning.
To disable current lights, you need to tick Disable light check box and save product. After this if you see your product on front side, you will see your product in black shades as there is no light in the scene.
Now lets start with adding lights to the scene. First we will add ambient light to the scene. Its default light which light entire scene. Add the ambient light and save product and see result.
The result is not much fancy. But now your product is at least visible. To make it more brighter, we will add another point light to the scene.
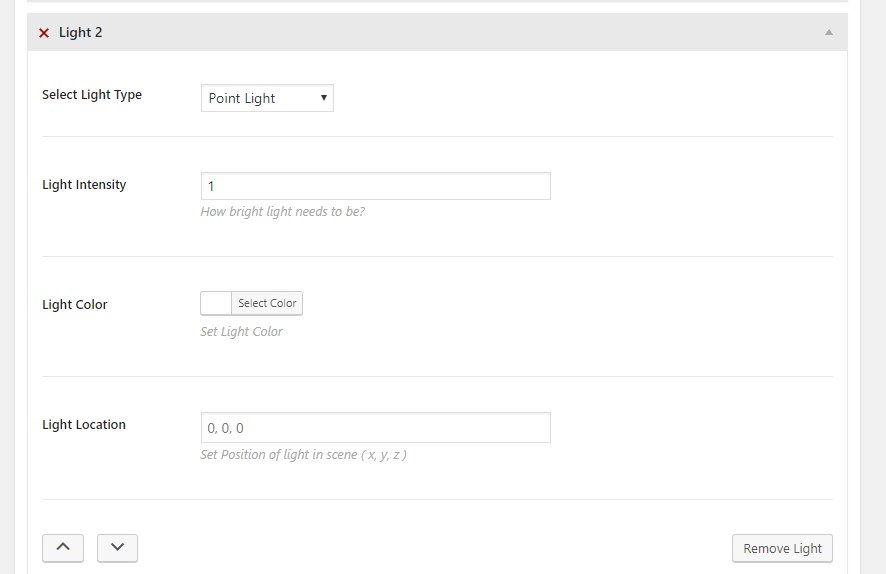
If you notice, the light is added to scene but its under the chair. So we will change its y cordinates to be at top of chair.
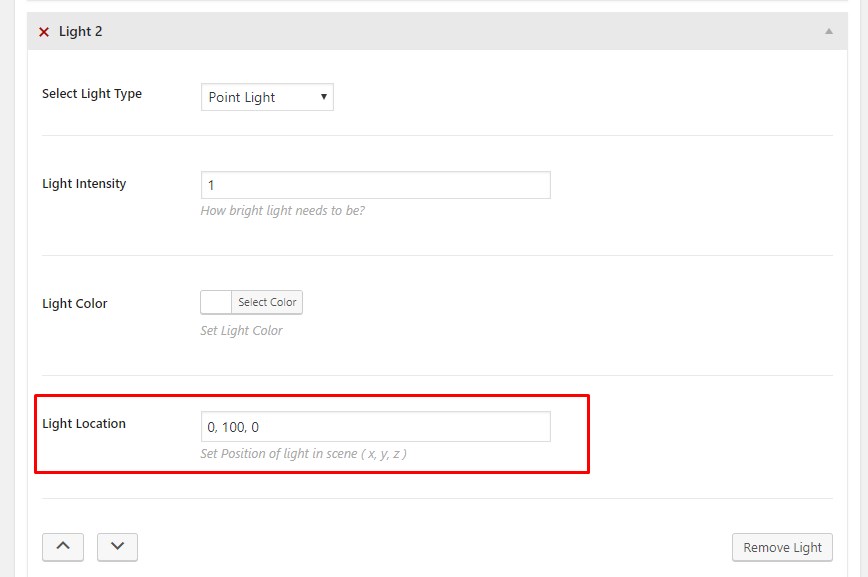
You can see the difference. For better and more advance result, you need to play with the parameters. add / remove lights. Set up proper intensity and location of each light. This will be different for each product design and how you want to showcase it. But after few attempt, you will get idea on how it works. Still if you dont get enough, you can always remove all custom lights and enable default lights back. It will work properly on 90% of the products at least.
Now, lets move to material group part.
First you need to decide which part of your 3D model you want to give option for customise. Then Find which material is applied to it and gets it material name.
If you crated this file in any 3D software then its easy for you to get material name, but if you are not familiar with 3D software, you can go here and upload your model and follow the steps.
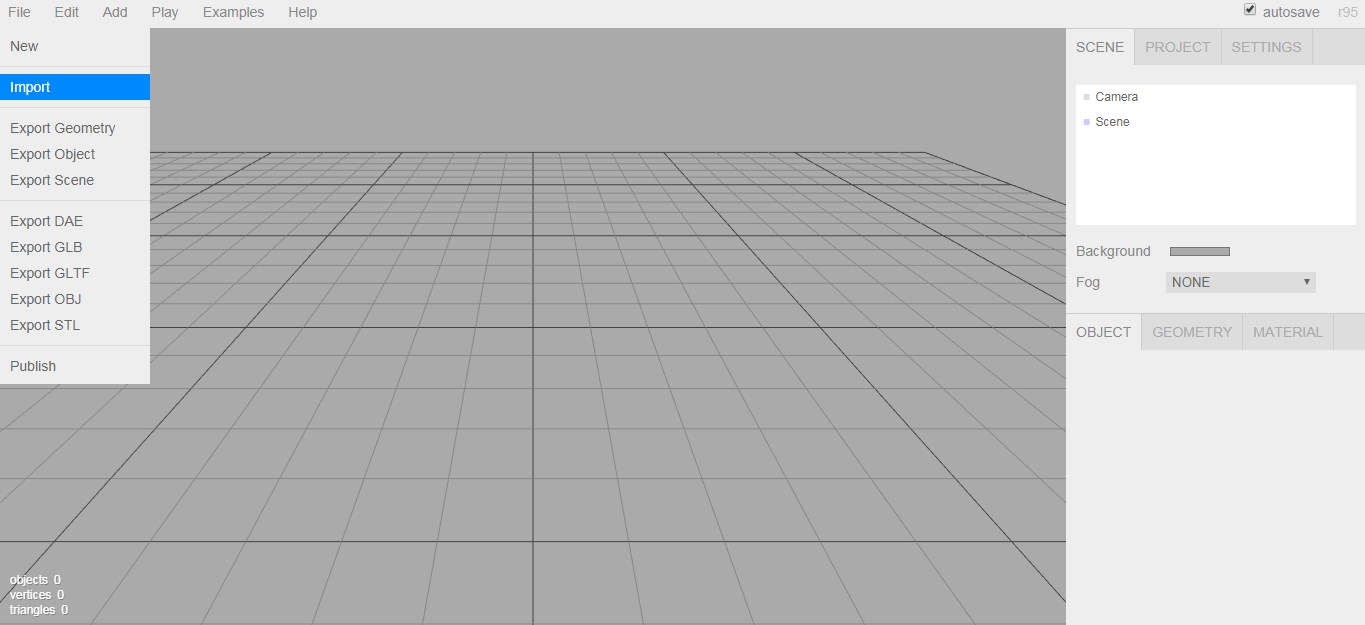
Import your model here. You will see the model in black as there is no light in scene. On the top from menu, press add and add light to the scene and place it above your model. You can add 2 lights, if you want to.
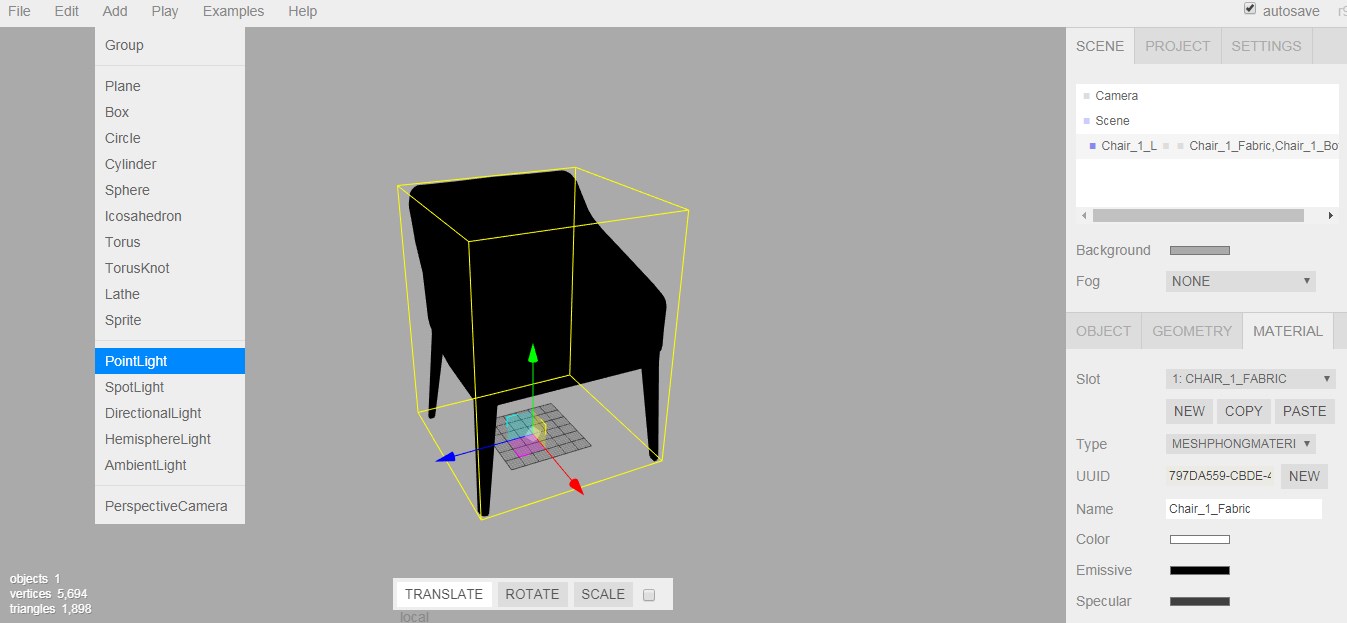
Now select your model. On selecting on right side panel, you will get properties of your selection where there are 3 tabs. press on material tab.

In material tab, there are 2 major things you need to see. first is material slot. It will show all the material assign to the object and you can select each one. Below that you can see there is a Name field which will give you material name. We need material name to add customise option.
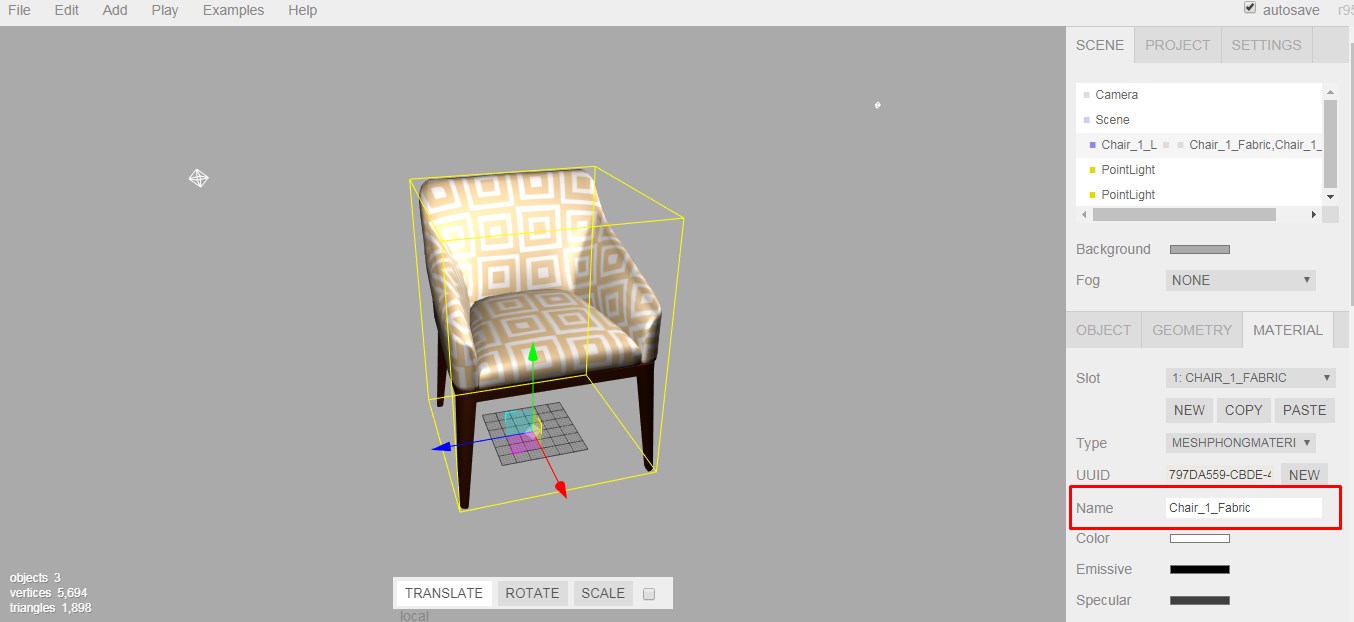
So we also have another slot and we also take it name parameter from here.
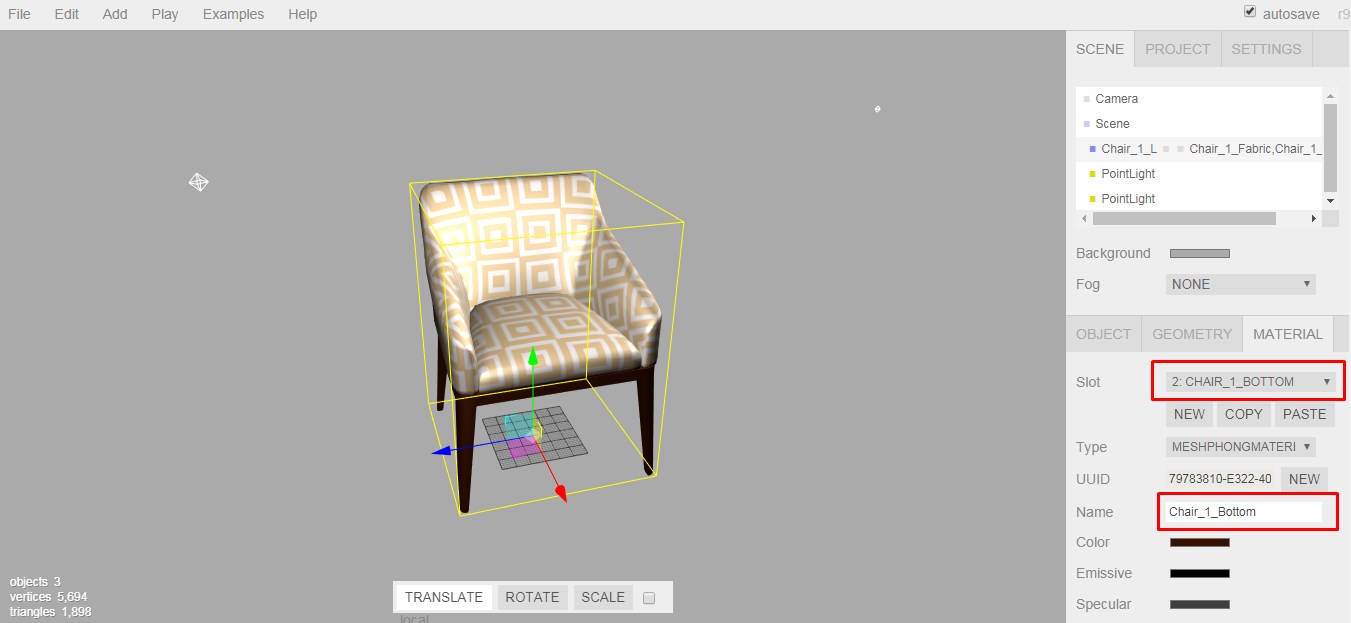
So now we have 2 material name. The names are easy and defining where its applied but if you find confusion in name, you can always change color value below name field and see where its applied.
- Chair_1_Fabric
- Chair_1_Bottom
Now we have what we need and we can move back to our configuration part.
Here, i will configure top sitting part and as a test you will configure bottom part your own.
Below is screenshot what i fill in fields and saved it.
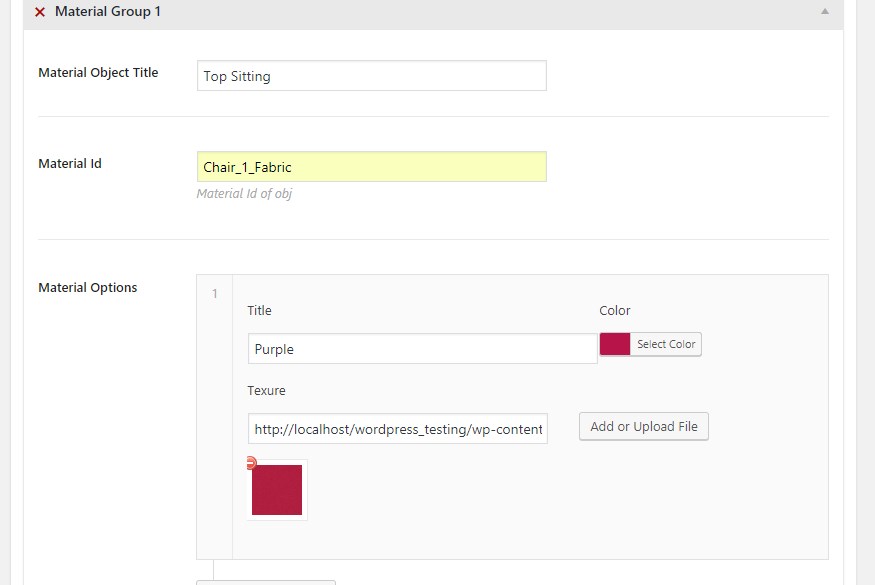
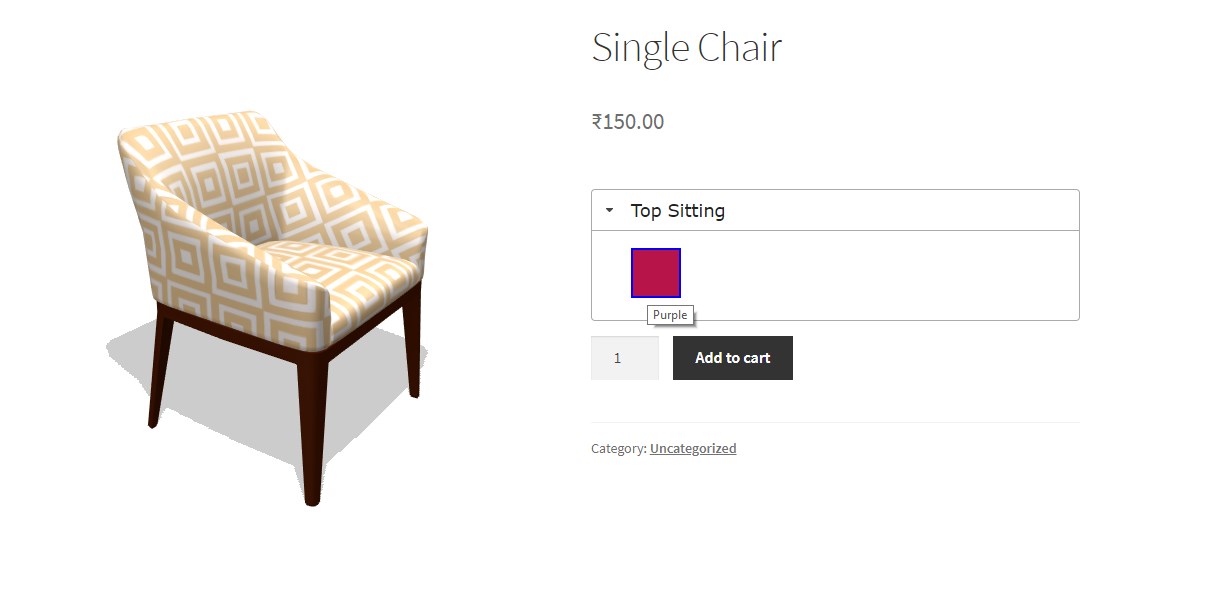
Clicking on it will change material texure of top fabric.
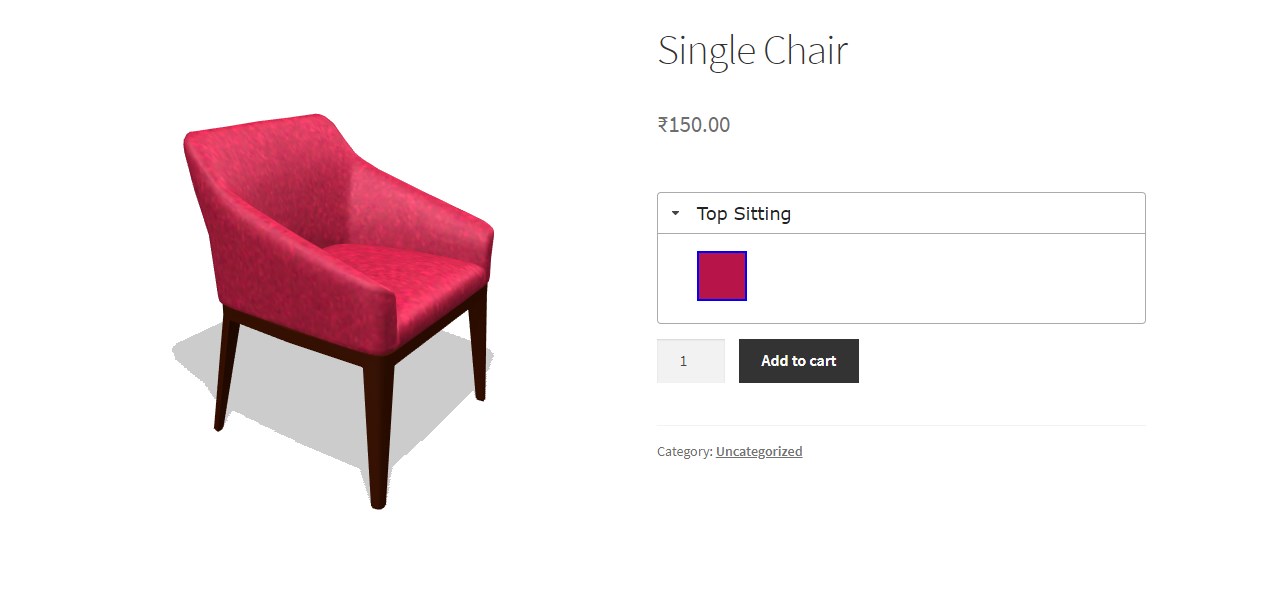
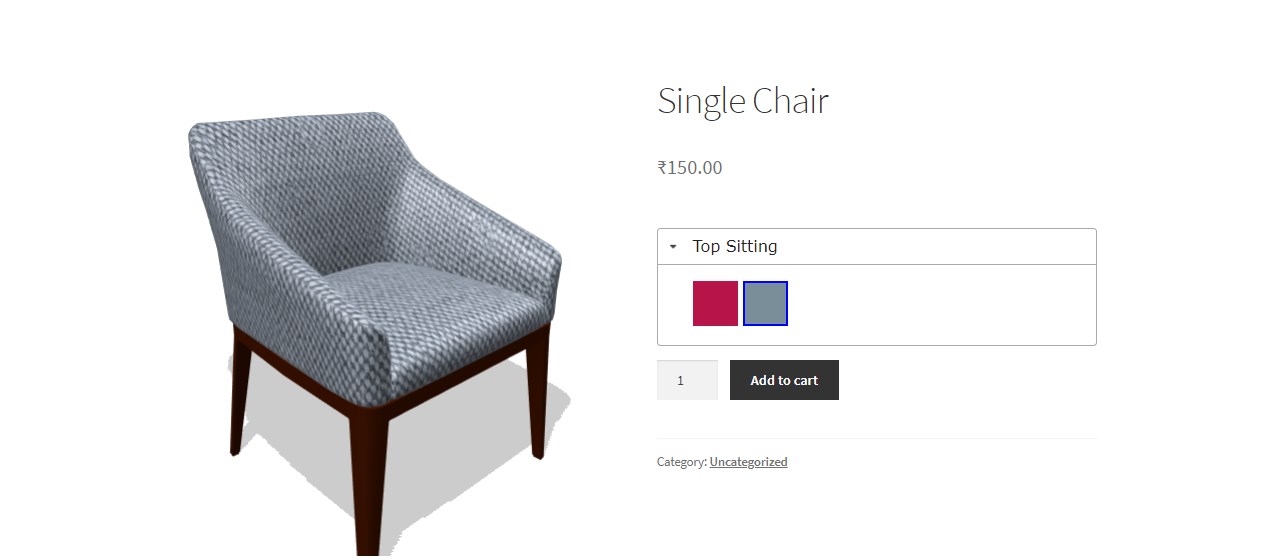
You can add multiple material option to it like below.
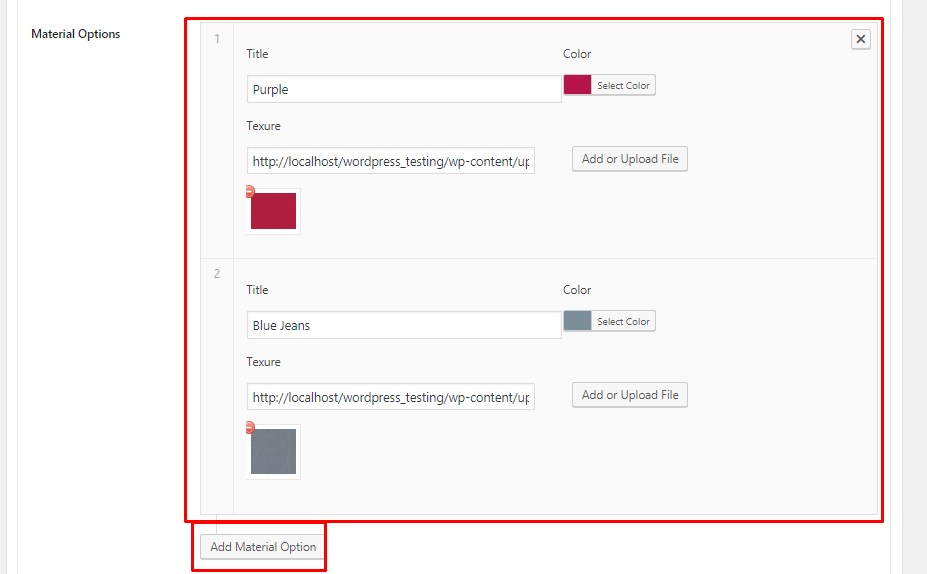
And that will automatically come on front side and you can choose it as option.
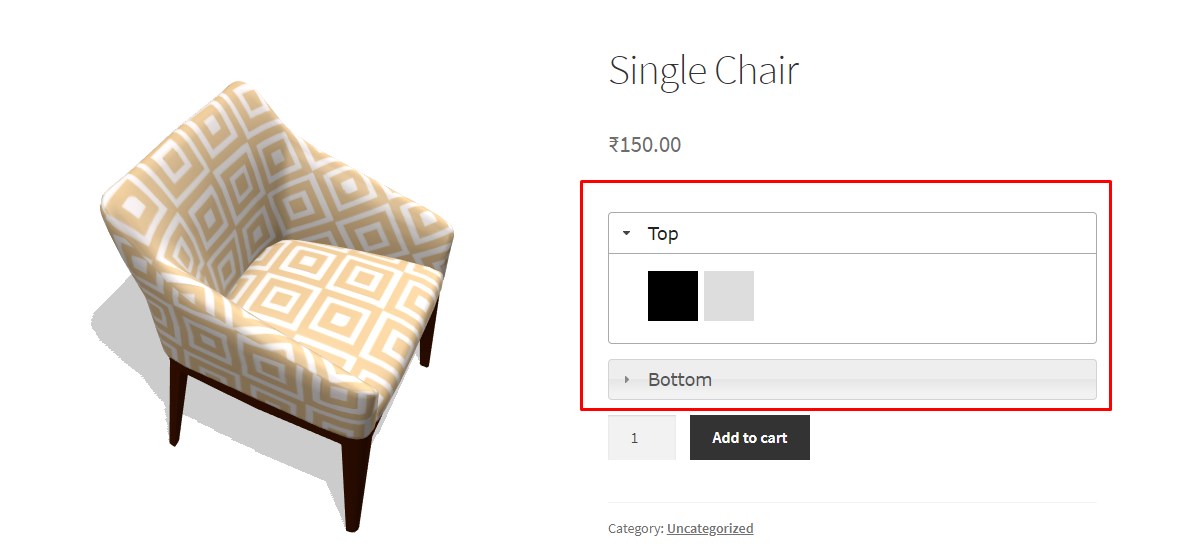
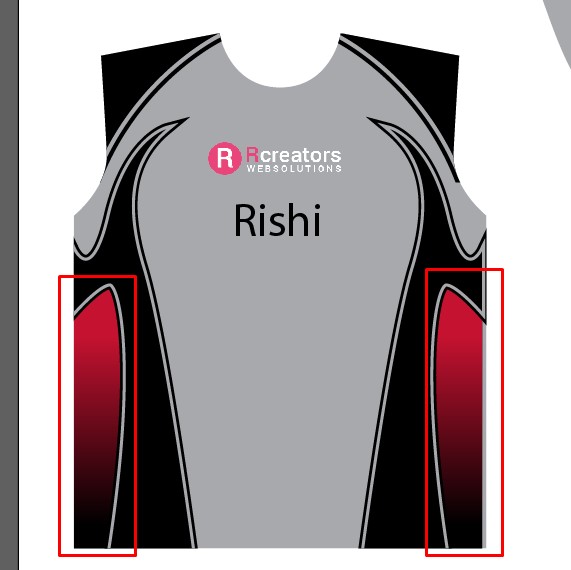
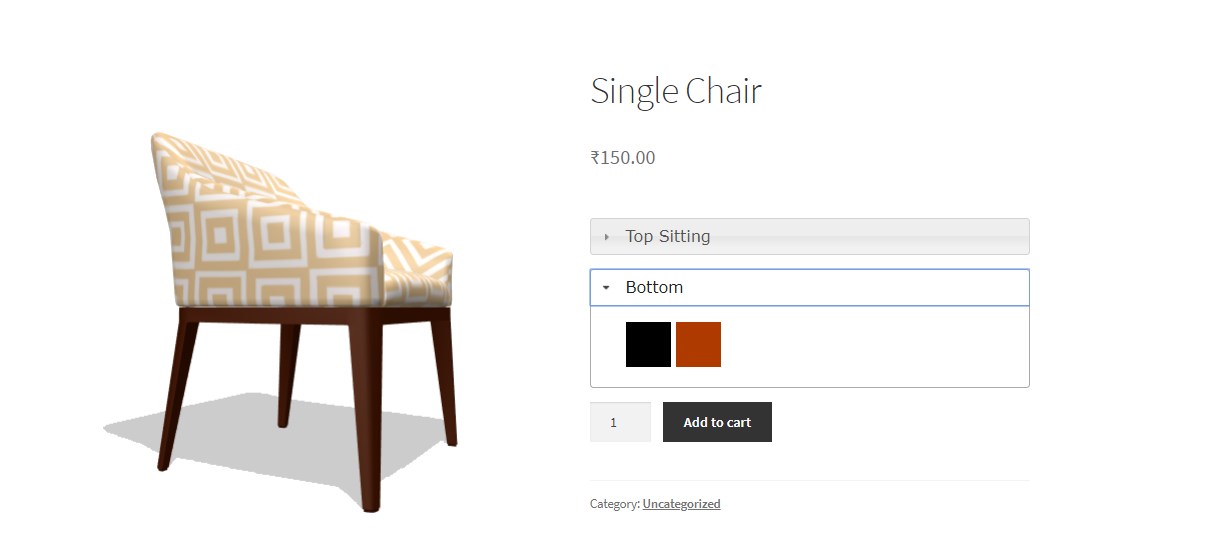
Now try to add another Material Group for bottom color and add material options to it. you need to get resulit something similar to this.
Final Thought
In the documentation, i tried to explain most of the things what plugin do and how it works including few 3D concept. Yet you are not able to find your way on configuring options properly, we provide paid service for same on hourly rate. Mail us your requirement at [email protected].
We also provide 3D model creation service. So if you want your 3D models build by us, you can contact us for same. if you go for both service, you will get discount as well.
I hope this plugin will help you to sell more items and make your store unique from others in a category.